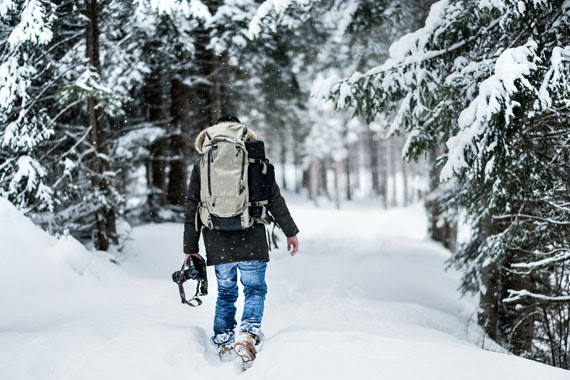
How to Set Up the Ultimate Travel Photography Backpack

Embarking on a photography adventure? Whether you’re scaling the misty mountains of Scotland or navigating the bustling streets of Tokyo, having a well-prepared travel photography backpack is essential. In this post, we’ll guide you through setting up your ultimate travel photography kit, ensuring you’re equipped and ready to capture those once-in-a-lifetime shots.

. Choosing the Right Backpack:

The foundation of your travel photography gear is the backpack. Look for something durable, weather-resistant, and comfortable to carry. Size matters too; it should be spacious enough to fit your gear but compact enough to meet airline carry-on requirements. Consider backpacks with customizable compartments to securely fit your camera equipment.

2. Camera and Lenses:

Your camera is your most important tool. Whether you prefer a DSLR, mirrorless, or a compact camera, ensure it’s up to the task. Pack lenses that cover a range of focal lengths; a wide-angle lens for landscapes, a standard zoom for general purposes, and maybe even a telephoto lens for distant subjects. Don’t forget lens cleaning kits to keep your shots spotless.
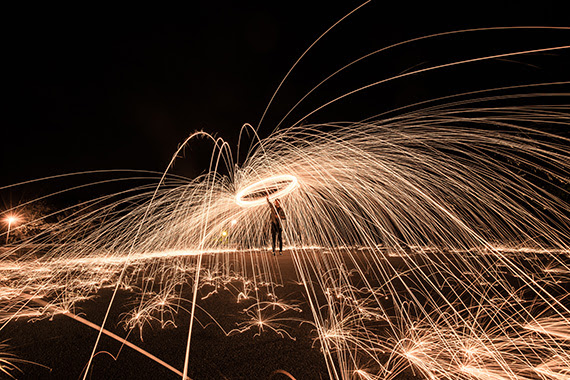
3. Tripod:

A lightweight compact tripod is a game-changer for travel photography. It’s essential for long exposure shots, night photography, and self-portraits. Look for one that’s sturdy yet folds down small enough to easily fit in your backpack.

4. Extra Batteries and Memory Cards:

You don’t want to miss a shot because you ran out of battery or memory. Pack extra batteries and memory cards, and consider a portable charger for emergencies.

5. Filters:

Filters can be useful in certain situations. A polarizing filter is great for reducing reflections and enhancing colors, while neutral density filters allow for longer exposure times in bright light.

6. Laptop or Tablet:

For longer trips, consider bringing a laptop or tablet for editing and backing up photos. Ensure it’s lightweight and has a good battery life. Don’t forget the external hard drive for extra storage.

7. Personal Comfort and Safety:

Pack for personal comfort and safety. This includes weather-appropriate clothing, a water bottle, sunscreen, and snacks. If you’re venturing into remote areas, a first-aid kit and a multi-tool can be lifesavers.

8. Miscellaneous Essentials:

Don’t forget the small stuff – lens cloths, a notebook and pen for jotting down details, and plastic bags to protect your gear in unexpected rain.

9. Customizing Your Pack:

Customize your pack based on your destination and the type of photography you plan to do. For wildlife photography, more telephoto lenses might be necessary. For urban landscapes, perhaps a few fast prime lenses.

Packing the ultimate travel photography backpack is about balancing the need for equipment with the need for mobility. Every item in your backpack should serve a purpose. With careful planning and the right gear, you’ll be well-equipped to capture stunning images that tell the story of your travels. Happy shooting!

The Importance of a Focal Point

A focal point is the part of an image that draws the eye of a viewer to the most important part of the image or the area that you want to highlight. How you do this will make or break the final image. If you don’t know how to create this point then you will not achieve much in your photography.

The professionals have all worked this one out and if you are attempting to create similar images then learn this point well. It frustrates the eye of a viewer if there is no focal point, as the eye is not drawn to any one particular part of the photo. The focal point only occupies a small part of the scene but will make or break the whole image. The simplest form of this is an isolated object seen from a distance on a plain background.

So how is this achieved successfully? Let’s take a look at a few pointers.

1. Placing the Focal Point

Fundamental to photography this rule needs to be learnt well and executed to perfection. If you know where to place your focal point then you will shoot great images every time. A focal point needs to be off centred and never in the middle of an image. The rule of thirds places it at a point that is very pleasing to the eye as discovered by the ancient Greeks. This golden rule will bring you success every time. Imagine a noughts and crosses or tic-tac-toe grid. Two lines across the image and two lines down the image—vertically and horizontally placed. Equally spaced, they cut the image up into thirds. Where these lines intersect are your focal points. The horizontal lines are where you place your horizons. The human eye loves to view subjects placed at these intersections. Take a magazine or travel book and take a look at how many times this rule is used effectively and see how your eye is drawn to them.

2. Selective Focus

This is an incredibly effective way to focus attention on your subject of focal point. You need to know how aperture and depth of field works in order to use it properly. But, basically it’s very simple. Your settings (e.g. f/2.8, f/4, f/5.6 and so on) change the size of your aperture all the way up to f/32. You only need to be concerned with the lower apertures for this effect. If your lens goes to f/1.2, brilliant, but most lenses won’t take you below f/4 or f/2.8, as they get more expensive the wider the aperture. Depth of field is the area of focus in front of and behind your subject. With the aperture wide open at f/2.8 you will have very little in focus which makes it so effective with selective focusing. Everything not on the same focal plane as the subject will be out of focus and thereby excluded from the viewer’s attention. The longer your lens, the less depth of field you will have and the more you will be able to selectively focus.

It’s a great way of drawing attention when used in conjunction with the rule of thirds.

3. Exposure

By underexposing parts of the image (i.e. making them darker), the areas that are light will stand out. If you are able to able to use this effectively the light parts will stand out as focal points and whatever you place here will become the point of focus in the photo. This really works well if you have a subject that is lighter than the underexposed, darker areas. Key to the process is knowing what the final image will look like in mind’s eye.

4. Light Source

This really pushes your photographic eye to the limits and if you see the opportunity and go for it, will result in a stunning photo. How this works is that when you see a shaft of light or a ray of sunlight entering a window or coming through the clouds, use it to place your subject. A patch of late afternoon sun in dimming light will create an area that is much lighter than the surroundings.

When you shoot an image and take the metering off this area, the surrounding environment will appear darker. The image now has a focal point that draws the eye in to the image. This will also work at night where a solitary window is lit and the surrounding area is dark. Experiment with this technique and you will soon be creating dramatically lit photos.

5. Eyes

By placing a person’s eyes on a two thirds intersection a viewers eyes are immediately drawn to that area. When the subject is looking down on something else like a child or an object your eye will be naturally drawn to the point where the subjects eyes are focused. Whenever you shoot a person eyes they will automatically become the focal point so if they are the focal point then you have a problem and they will compete for attention.

6. Two Focal Points

Sometimes you will have two focal points and there will be competition, but, you can offset this by using size. One of the focal points must be considerably larger which will draw the eye but immediately your focus will move to the smaller focal point. If they are the same size the viewer’s eyes will dart between them. So be very careful when using a double focal point.

A focal point is essential to any great image and you need to be able to create this in every image. An image lacking this will appear flat and without impact. As you learn digital photography it will become easier and easier to place it in the right position. Happy shooting!

Photo Composition: How to Tell a More Compelling Story

They say that a picture is worth a thousand words. That means that your photographs should be a great way for you to communicate. The question is, do your photographs communicate the right thousand words to tell your story?

Have you ever had the experience of photographing in a wonderful location, feeling eager to rush home and look at your pictures, only to be disappointed in the results? It’s quite a challenge to convert a three-dimensional, full sensory experience into a two-dimensional photograph.

I would like to share a few tips on composition that I think can boost your success rate in capturing your experience while photographing. Instead of just raising your camera for a quick snapshot, take the time to make a careful composition that will guide your viewer to understand what you think is important in the scene, and even how you feel about it.

Tip #1: Choose colors and tones that reinforce your story

Light is the fundamental building block of any image. Light produces two kinds of contrast: color contrast and tonal contrast. Color is the hue that you see, like red, or green, or purple. Tone is another word for brightness, or how light or dark something is. Our brains are good at forming associations, and we associate colors and tones with particular feelings. These same associations appear in our spoken language. You’ve heard the expressions, “He was in a dark mood,” and “She was feeling blue.”

Blue connotes melancholy or tranquility. It’s also a color associated with stability and reliability. (What color are the logos of IBM, Microsoft, and Ford?) Red is the color of passion. Photographing an orange beach umbrella gives a stronger impression of a hot day than a purple one. Using dark tones creates a sense of gloom and foreboding. Light-toned images make us feel light-hearted and uplifted. Consider carefully whether the tones and colors in your image strengthen the story you want to tell or contradict it.

Tip #2: Use lines to guide your viewer’s eye

Color and tone also reveal lines in your image. Lines are the boundaries created where two contrasting colors or tones meet. A thin shape, like a road, the stem of a plant, or a tree branch, may also be perceived as a line in your photograph. The brain’s visual cortex is programmed at a fundamental level to follow lines.

This is a powerful tool for you as a photographer. You can guide your viewer’s eye toward what you consider important in the image by using something in the environment to point to it. Conversely, be careful not to inadvertently place lines so that they lead your viewer out of the image.

Tip #3: Orient the lines in your image so that they convey the right emotion

Just as with colors, our brains also make emotional associations with line orientation. Vertical lines in an image give an impression of power, strength and pride. Horizontal lines are stable and calm. Diagonal lines, on the other hand, are dynamic, and signify motion or change. Curved lines may convey a sense of melancholy or of hope, depending on the direction in which they curve.

Think carefully when composing your image so that you include colors, tones, and lines that reinforce the story you’re trying to tell. You’ll be much more likely to create a photograph that captures and communicates how you felt when you were observing the original scene.

Top 10 Composition Tips in Photography – Must Read

Photography is all about composition. If you can’t compose an image, you can’t take photos. That’s the bottom line. This is where your photography journey starts as a beginner. Learning to place the elements in the photo is natural for some, but the rest of us we have to learn.

So what is composition? The dictionary definition is “the act of combining parts or elements to form a whole.” What you are looking to do in composing an image is to take the important parts of the scene and combine them to create a photo that’s pleasing to the eye. This is all well and good, but how can we do this most effectively? Here are my top ten tips.

1. Clearly identify your subject

This is the non-negotiable of photography. Unless your subject is the focal point of the image you don’t have a photo. When looking at the image, a person should be able to clearly identify the subject. So make sure you give enough attention to the subject of your focus.

2. Fill your frame

One of the most common mistakes made by budding photographers is failing to fill the frame with their subject or the major elements of the image. Get in closer and exclude the parts that you don’t want. Open space serves no purpose when the subject is too small or cannot be identified.

3. Horizontal vs. vertical

Camera manufacturers are to blame for this dilemma because all cameras are designed to be held in a horizontal format. It shouldn’t be an ‘either or’ situation but rather a ‘both’. Try to shoot 50 percent of the time in both formats. There is no rule which is best, and the key is to experiment.

4. Dramatic angles

Shoot from high up or low down. Use your feet and move around the subject looking for an optimum angle. Don’t be afraid to get down on your stomach or climb a tree. Look for different and dramatic angles that will make your images more striking.

5. Don’t amputate

This means that you shouldn’t cut off part of your subject unless it is intentional to create an effect. Missing parts of people or objects irritate the viewer and create an incomplete image. It distracts the eye. So watch the edges of your image.

6. The rule of thirds

Imagine a tic tac toe grid or noughts and crosses lines running across your image dividing it into thirds horizontally and vertically. Where the lines cross or intersect are the best placement points for your subjects or objects. Never place the horizon of a landscape image in the center of your image. Always place it on a horizontal two thirds line. Subjects like lighthouses can be placed along one of the vertical two thirds lines.

7. Look for frames

Frames come in two types: natural or man-made. An example of a natural frame would be an opening in trees or a rock formation with a hole in it. Man-made frames are doorways, windows, or arches. All of these help contain the subject or scene in a form that is pleasing to the eye.

8. Simplify

Trying to include too much in an image often spoils it. An image that is cluttered causes the viewer’s eye to dart around the image trying to make sense of it. Less is more, as the old adage goes. Eliminate anything that’s distracting or unnecessary to the memory you are attempting to create.

9. Watch your background

Make sure that there is nothing in the background that detracts from your subject—things like chimneys growing out of heads and other subjects diverting the eye from the main subject. You want balance by not going in too close but including enough of the environment of the subject to contextualize it.

10. Lines, patterns and shapes

Look for interesting patterns, lines and shapes. Lines lead the eye to focal points. A river, road, fence or path in a classic ‘s’ shape draws the eye along the route into your image. Strong verticals give height to your image, and diagonals add depth. Turn your viewfinder, allowing straight lines to travel from corner to corner in the image.

Key to great composing is thought. Think before your press the shutter button and consider all of these points. Create a mental check list to help you add these elements and create that great composition.

How to Use Bulb Mode on a Camera for innovation

There is a special setting on all DSLR and mirrorless cameras that allows the photographer to go beyond the longest automatic shutter speed setting of 30 seconds. In fact, this special setting allows infinitely longs exposures to be made. This is the Bulb setting, or Bulb exposure mode.

The shutter speed range on a DSLR camera finishes at 30 seconds. One click below that selection is Bulb, which allows the photographer to manually hold the shutter open for as long as is required as the shutter button is pressed down. The camera bulb exposure setting is only available in Manual mode.

The Bulb mode is basically a creative feature. It allows shots to be taken that are minutes long, rather than seconds. A typical image to capture using this feature is one of star trails when the night sky is clear. Simply aim the camera to the north or south celestial pole, depending on which hemisphere you live.

Another common image to capture is of the trails of vehicle lights when it is dark. These moving lights will create artistic streaks of white and red patterns emitted from the head lights and tail lights of passing traffic. If you are near a traffic junction you may capture orange streaks from indicator lights. And if you’re lucky enough, you may get a streak of blue from the flashing light of an emergency vehicle.

Here then are the three things you must do in order to shoot in Bulb mode, in other words, with the camera’s shutter open:

Use a Tripod: Attach the camera to a tripod in order to ensure that no camera movement will ruin the shot. You don’t have to use a tripod so long as the camera is on a solid base, like a wall. Turn off the any anti-shake mechanisms you may might have on your camera or on the lens.

Use a Remote Shutter Release: A remote shutter release will prevent vibrations ruining the shot as you press the shutter button. No matter how careful you are, you will always cause a tiny bit of vibration as you depress the shutter button. That doesn’t matter with fast shutter speeds, but in Bulb mode you will record vibrations, however small. If you don’t have a remote cable, use the camera’s built-in self-timer delay, which is just as effective. A two second delay will be adequate.

Switch to Manual Mode: While metering can be less straightforward with the Bulb exposure setting due to the extended exposure times, it’s still a useful guide for initial settings. Therefore, switch your camera to Manual mode to have full control over the exposure. Start by selecting an aperture that suits your scene; f/8 or f/11 are good starting points as they often provide a sharp image across a wide depth of field. Set your ISO to a low value like 100 or 200 to reduce sensor noise, which can be more pronounced in long exposures. Because Bulb mode exposures can vary greatly, it’s advisable to take several test shots to refine your settings. Adjust the aperture, ISO, and initial exposure time based on these tests until you achieve the desired effect for your final long-exposure image in Bulb mode.