Night photography is enchanting, taking us into a world where light dances mysteriously against the vast canvas of the dark. Whether you’re a seasoned photographer or someone just starting out, venturing into the realm of night photography can introduce you to a host of challenges. But with challenges come opportunities for mesmerizing shots that truly stand out. Here are some of the most fun and difficult night photography tricks you can try.
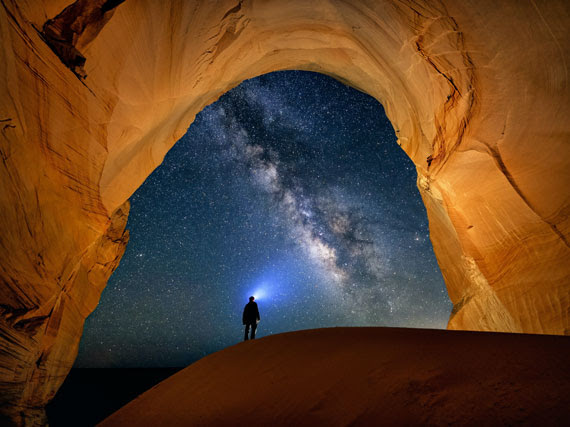
Night Photo captured by Brad West
1. Star Trails
The Fun: Capturing the movement of stars as the Earth rotates can result in ethereal images.
The Challenge: This requires a clear night, a sturdy tripod, and patience. You need long exposures or multiple shorter exposures that are later combined in post-processing.
2. Light Painting
The Fun: Use flashlights, glow sticks, or any light source to “paint” in the dark while the shutter remains open.
The Challenge: Mastering this technique requires understanding the behavior of light, controlling the light sources, and sometimes even choreographing movements.
3. Steel Wool Spinning
The Fun: Create a cascade of sparks that look like a shower of meteors.
The Challenge: Safety first! You’ll be setting steel wool on fire and spinning it, so ensure you’re in a safe, open space, and have a fire extinguisher or water source nearby.
4. Capturing Bioluminescence
The Fun: Natural light shows caused by living organisms, like plankton, in the water.
The Challenge: Bioluminescence is unpredictable and can be faint, so getting a crisp shot without noise can be tough.
5. Bokeh Shapes
The Fun: Transform city lights or distant lights into unique shapes like hearts, stars, or any design you craft.
The Challenge: You’ll need to create a custom bokeh filter for your lens or buy one. The real challenge is achieving the right focus and distance for a clear bokeh effect.
6. Time-Lapse Photography
The Fun: Compressing hours into seconds, this method showcases the motion of stars, clouds, and cityscapes.
The Challenge: Requires patience, a consistent setting on the camera, and post-processing skills to stitch together the images or video frames.
7. Moonlit Landscapes
The Fun: Harness the power of the moon to light your landscapes, turning nighttime scenes into dreamy, day-like images.
The Challenge: The brightness of the moon can vary, and if it’s too bright, it may overpower the stars. Balancing the moonlight with other elements can be tricky.
8. Neon and Sign Reflections
The Fun: After a rain shower, city streets can turn into mirrors, reflecting neon signs and street lights.
The Challenge: Finding the right angle and ensuring the reflections are vivid and sharp, not muddled.
9. Silhouettes and Shadows
The Fun: Using sparse light sources, like streetlights or moonlight, to cast dramatic shadows or silhouettes.
The Challenge: Getting the right contrast and ensuring the silhouette or shadow retains its shape and detail.
10. Astro Self-Portraits
The Fun: Place yourself in the vast expanse of a starry sky or under the arch of the Milky Way.
The Challenge: Balancing the light on yourself, often using a dim light source, while keeping the stars or Milky Way prominent.
Remember, the real fun in night photography is in the experimentation. Challenges will arise, but they’re merely stepping stones towards getting that magical shot. So grab your gear, head out under the cloak of darkness, and let the night be your muse.
http://www.delhiphotographyclub.com/wp-content/uploads/2020/03/Copy-of-Celebrate-Freedom-3.png00#iamdpchttp://www.delhiphotographyclub.com/wp-content/uploads/2020/03/Copy-of-Celebrate-Freedom-3.png#iamdpc2023-10-05 08:17:392023-10-05 09:16:08Night Photography Tricks: The Fun, the Difficult, and the Magical
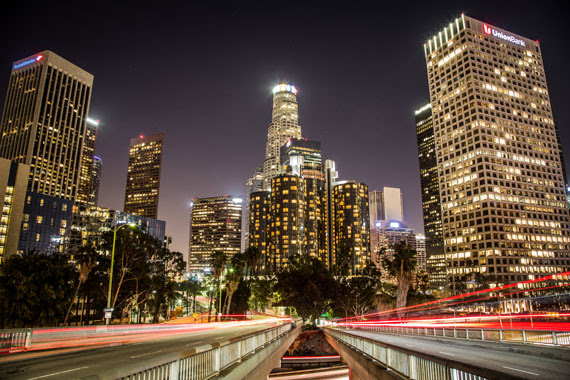
Cityscape photography, often viewed as the urban cousin of landscape photography, captures the man-made wonder of our urban environments. Whether you’re aiming to capture the grandeur of towering skyscrapers, the dance of city lights, or the daily buzz of urban life, the right techniques and tools can make a world of difference.
Understanding Cityscape Photography
At its core, cityscape photography encapsulates the beauty, architecture, and vibrancy of urban landscapes. From the neoclassical edifices of Europe to the cutting-edge skyscrapers of Asia, cityscapes tell stories of progress, history, and human ambition.
Essential Equipment for Cityscape Photography
Lenses:
Wide-angle lens (10-24mm): Ideal for capturing sweeping vistas of urban jungles.
Telephoto lens (70-200mm): Perfect for zooming in on intricate architectural details or isolating subjects against a vast city backdrop.
Tripod: A sturdy tripod is invaluable. For shots with long exposures, like capturing the streaks of cars or the gentle flow of water, a tripod ensures your camera stays still and your images are crisp.
Helpful Filters:
Polarizer: Helps to reduce reflections, particularly useful for buildings with glass facades.
Neutral Density (ND) filter: Essential for achieving long exposure effects during bright daylight.
Optimal Camera Settings for Cityscapes
Mode: Opt for Manual (M) if you’re familiar with settings or Aperture Priority (Av/A) if you’d like the camera to determine the shutter speed.
Aperture: A range of f/8 to f/16 offers a good depth of field, ensuring both foreground and background elements are in focus.
Shutter Speed: This will vary based on your desired effect. For capturing light trails, you’ll need longer exposures. To freeze the bustle of the city, opt for faster speeds.
ISO: To keep images noise-free, aim for ISO 100-400. Only increase the ISO in situations where light is limited and using a tripod isn’t feasible.
Timing is Everything
Blue Hour: This magical time, either before sunrise or after sunset, provides a serene blue tint to the sky, making city lights truly pop.
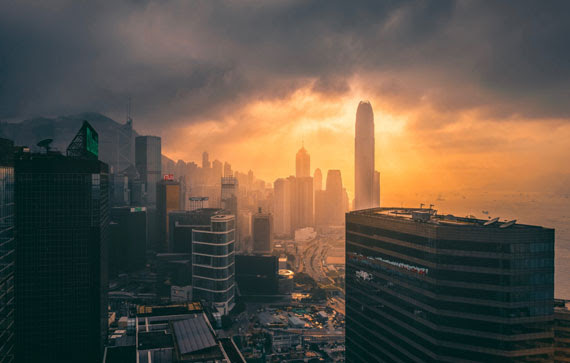
Golden Hour: Occurring shortly after sunrise or just before sunset, this time bathes the city in a warm and soft light, perfect for capturing the city’s glow.
Night: As cities come alive with lights, shooting at night can showcase the city’s vibrant nocturnal personality.
Pro Tips for Exceptional Cityscapes
Bracketing: This involves taking several shots of the same scene at different exposures. Later, these can be blended in post-processing to achieve a balanced and detailed image, also known as High Dynamic Range (HDR) imaging.
Focusing in Low Light: When the camera struggles to autofocus in dim settings, switch to manual focus. Using the Live View mode, zoom in on a well-defined part (like a building’s edge) and adjust the focus manually.
Depth of Field: If your scene includes a prominent foreground element, like a statue or fountain, consider focus stacking. This technique involves taking multiple shots with different focus points and merging them in post-production to achieve an image that’s sharp from front to back.
Cityscape photography, like all art forms, thrives on experimentation. While these guidelines provide a solid starting point, the true essence and vibe of a city can best be captured when photographers bring their unique perspective and creativity into play. So, head out, explore the urban wilderness, and most importantly, enjoy the process of immortalizing cityscapes. Happy shooting!
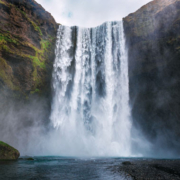
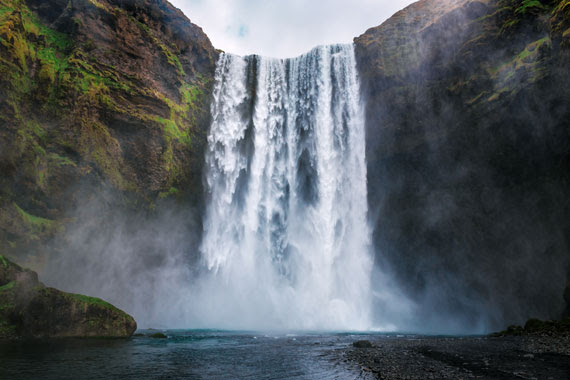
Waterfall photography is a genre that captivates many with its ethereal beauty and dynamic compositions. One of the age-old debates within this realm is whether to use fast or slow shutter speeds when capturing waterfalls. Both approaches have their merits and can produce breathtaking results. Here, we’ll dive deep into the argument, exploring the advantages and disadvantages of each method.
1. Fast Shutter Speeds: Freezing the Action
Using a fast shutter speed means that the camera’s sensor is exposed to light for a very brief period.
Advantages:
Detail Capture: A fast shutter can freeze every droplet, allowing for a detailed capture of the water’s texture and movement.
Reality Reflection: This method offers a more “realistic” portrayal of the scene as our eyes see it.
Safety: In certain lighting conditions, a fast shutter speed might prevent overexposure.
Disadvantages:
Potential for Flatness: If not executed well, the photograph can feel lifeless or static, lacking the inherent motion and energy of a waterfall.
Higher ISO Requirement: To compensate for the reduced light from the quick shutter, you might need to increase the ISO, which could introduce noise to the photo.
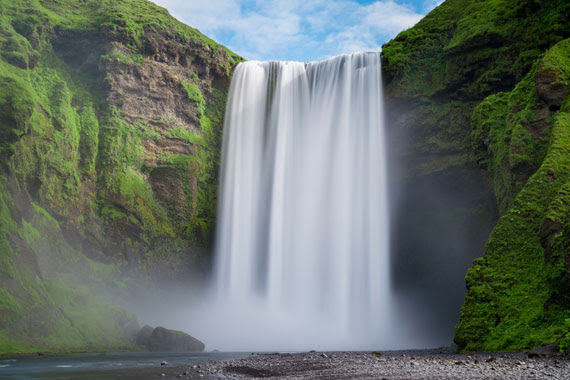
2. Slow Shutter Speeds: Creating a Silky Effect
When photographers use slow shutter speeds for waterfalls, the camera sensor is exposed to light for an extended period, often necessitating the use of a tripod to prevent camera shake.
Advantages:
Ethereal Feel: The prolonged exposure creates a milky or silky effect in the moving water, often evoking a dreamy, surreal atmosphere.
Enhanced Mood: This method can amplify the mood, whether it’s tranquil, majestic, or mysterious.
Low ISO: With a slower shutter, there’s more light hitting the sensor, allowing photographers to use a lower ISO, potentially yielding cleaner shots.
Disadvantages:
Loss of Texture: The slow shutter speed might smooth out interesting textures and details in the water.
Risk of Overexposure: Especially in bright conditions, there’s a risk of overexposing parts of the photo, which can lose details in the highlights.
Need for Stability: Achieving a sharp photo with a slow shutter speed almost always requires a tripod or stabilizing equipment.
Striking a Balance:
Instead of staunchly adhering to one method, many photographers adopt a balanced approach. Here are some tips:
Evaluate the Scene: The nature of the waterfall, its surroundings, and the lighting conditions should guide your decision.
Bracketing: Try capturing multiple shots at varying shutter speeds and choose the best later or blend them in post-production.
Use ND Filters: Neutral Density (ND) filters allow for slower shutter speeds even in bright conditions by reducing the amount of light entering the lens.
Conclusion:
While the debate between fast and slow shutter speeds for waterfall photography continues, what’s undeniable is the beauty of the subject. Both methods have their place, and the choice often comes down to personal preference and the story one wishes to convey. Whether you’re a fan of the crisp clarity of fast shutter speeds or the dreamlike quality of slow ones, mastering both techniques will only enhance your versatility and creativity as a photographer.
https://delhiphotographyclub.com/wp-content/uploads/2023/09/unnamed-48.jpg380570#iamdpchttp://www.delhiphotographyclub.com/wp-content/uploads/2020/03/Copy-of-Celebrate-Freedom-3.png#iamdpc2023-09-19 11:08:112023-10-05 08:06:20Waterfall Photography Debate: Fast vs. Slow Shutter Speeds
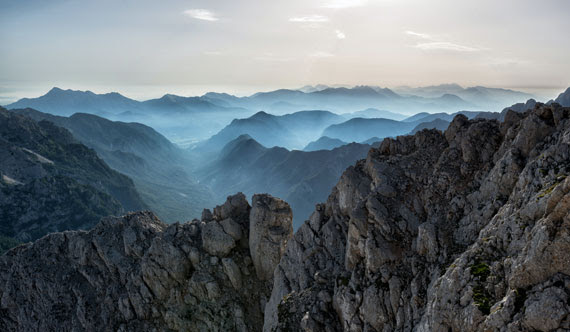
One of the primary challenges in landscape photography is capturing the vastness and grandeur of a scene in a way that translates well to a two-dimensional image. This is where the concept of ‘scale’ comes into play. Including an element of scale can provide context and a sense of proportion, making your landscapes more compelling and relatable. Here are some techniques to effectively show scale in your landscape photographs:
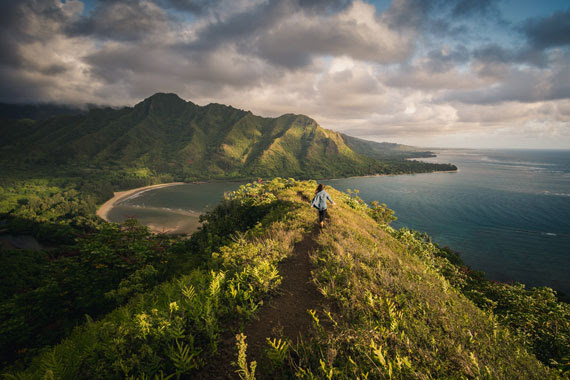
1. Introduce a Human Element
Including a person in your landscape shot is one of the easiest ways to convey scale. The viewer instinctively knows the approximate size of a human, which provides an instant reference. This technique works especially well with grand landscapes such as mountains, canyons, or vast fields.
2. Use Familiar Objects
If a human figure isn’t available or doesn’t fit the context, other familiar objects can serve as a reference. This can include things like vehicles, animals, or even buildings. For example, a lone car on a winding road amidst massive mountains can effectively show the enormity of the scene.
3. Layering and Foreground Elements
Introducing layers in your image, especially with a strong foreground element, can provide depth and a sense of scale. A prominent rock, tree, or other subject in the foreground, juxtaposed with the middle and background layers, helps the viewer gauge distances and sizes in the scene.
4. Use Wide Lenses
Wide-angle lenses inherently capture more of a scene, making vast landscapes look even vaster. When you pair a wide lens with a strong foreground element, the exaggeration of perspective further amplifies the sense of scale.
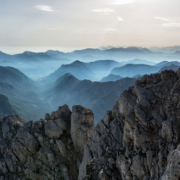
5. Capture Atmospheric Perspective
Atmospheric perspective is the phenomenon where distant objects appear lighter and less saturated due to atmospheric haze. Capturing scenes with evident atmospheric perspective (like layers of mountains fading into the distance) can give a sense of vastness and depth, thus emphasizing scale.
6. Play with Shadows and Light
The play of light and shadow, especially during the golden hours of sunrise and sunset, can add depth and dimension to a scene. Long shadows cast by trees, rocks, or mountains can show the viewer how grand or tall these elements are.
7. Use Leading Lines
Leading lines can guide a viewer’s eye through an image and provide a visual journey that showcases the scale. Rivers, roads, or even patterns in sand dunes can serve as leading lines, drawing the viewer from the foreground to the distant horizon.
8. Drones and Aerial Photography
With the rise of drone photography, there’s a unique opportunity to capture landscapes from a bird’s-eye view. This perspective can reveal patterns and proportions that are hard to grasp from the ground, offering a fresh way to showcase scale.
Conveying scale in landscape photography is all about providing context. By giving the viewer a reference point, be it a person, object, or the play of light and shadow, you can transform a flat image into a story of vastness and grandeur. Next time you’re out with your camera, consider these techniques to infuse a sense of scale into your landscapes, making them more immersive and captivating.
https://delhiphotographyclub.com/wp-content/uploads/2023/09/unnamed-46.jpg332570#iamdpchttp://www.delhiphotographyclub.com/wp-content/uploads/2020/03/Copy-of-Celebrate-Freedom-3.png#iamdpc2023-09-19 11:00:192023-10-05 08:12:40Mastering the Art of Scale in Landscape Photography
When you as a photographer—amateur or professional, analog or digital–practice your craft or hobby, you will at one time or another become acquainted with the three letters ISO. If the camera does not get enough light onto the sensor or film, the images will be too dark.
To correct this you can set a higher value on the ISO. All photographers are dependent on light and lighting conditions can be very variable at different locations or times of day. The ISO value is for that reason an important tool that allows the photographer to be able to work effectively in many different lighting conditions.
ISO value has influence on the shutter speed and aperture for any photo shoot. Deep in the rain forest, to a concert or a moonlight walk, where there is little light available, it will by using this tool will be possible to get excellent pictures without using a tripod. This is one of the reasons why the digital cameras has made it much easier to be a photographer.
ISO Indicates the Sensitivity of the Image Sensor
With ISO (International Standards Organization, previously known as ASA), we mean how quickly a film or digital sensor is capable of recording light. An image sensor set to ISO 100 requires twice as much light to achieve a normal exposure, as when the sensor is set to ISO 200.
In order to get twice the light the shutter speed must either be doubled (e.g., from 1/60 to 1/30 seconds) or the aperture must be opened up a whole f-stop (e.g., from f/5.6 to f/4).
That may not sound like a good idea to have to double the shutter speed so that we risk blurring the picture? Why doesn’t we always set the ISO speed as high as possible (e.g., ISO 1600) to obtain the fastest possible shutter speeds?
Higher ISO Values Produces More Noise
The downside of raising the ISO number is more noisy images – in the film world, this is a bit more romantically known as grain.
High ISO Entails Several Drawbacks
It is not just noise that increases with increased ISO settings. There are actually three “problems” that occur: increased noise, reduced sharpness and reduced contrast ratio.
High ISO = High Noise (Slightly exaggerated to show effect in this example)
The last two problems are usually marginal. The decrease in the sharpness of the increased noise that hides the details. Reduced contrast ratio refers to the ability to see details/nuances in the shadow areas as well as highlights.
Is Noise Always Negative?
People often tend to have a hard time telling the difference between images with low and high ISO speeds and very large prints. Therefore, it is difficult to choose which you prefer – a little “noise” doesn’t always disturb the picture. It may even bring a little feeling into the photo.
Different Cameras Provide Different Levels of Noise
Now you may think that you do not recognize this at all – when you test high ISO settings on your camera, the pictures may seem to be very noisy, much more noisy?
Yes, the noise is very different between different cameras and it has been an enormous development in recent years. If you have a compact camera, the risk that your images even at ISO 400 looks like ISO 3200 in other cameras. But if you use a modern digital SLR, you should be able to get great pictures even on ISO 800 and maybe even at higher ISO speeds if your camera allows it.
The problems we have these days when we assess the digital images is that we would look at them maximum zoomed in on the screen. However do not forget to relate to the possible noise you see to what size you actually use the image. Honestly, how many images to print larger than A5/A4?
How High ISO Should I Tolerate in My Camera?
Test your camera! Take a picture of the same motif with different ISO settings and print or send images to the photo lab. The most challenging is to shoot indoors in a low light setting. To try different ISO settings in daylight gives surprisingly comparable results, it is in low light conditions the major problems occur.
This is What You Gain by Increasing the ISO Settings
Now I have spent the whole article to explain the potential problems of raising the ISO. Let us finally turn to the issue and look at the opportunities provided by changing the ISO value.
By Raising the ISO Setting, You Can:
– Speed Up the Shutter Speed.
It is common to have problems getting fast shutter speeds when taking pictures indoors at night (= reduced risk of image blur). Although you may have opened the aperture to the max, you may even have to raise the ISO as high you think the quality will allow.
– Reduce the Aperture Setting.
Instead of changing the shutter speed, you can choose to reduce the aperture (for example, from f/4 to f/5.6) if you need a greater depth of field.
– Try a Combination of Both.
For example, if you raise the ISO setting from 100 to 400, you have doubled the ISO value in two steps. This allows for faster shutter speeds combined with reduced aperture, like going from 1/30 to 1/60 sec. (= 1 step) and f/4 to f/5.6 (= 1 step).
Is it Possible to Lower the ISO Setting From Time to Time?
The most common is that you want to increase the ISO value, but if there is a lot of light in the scene it can be justified to go the other way. Here are three examples:
Example 1:
You want to shoot a stream and use a slow shutter speed around half a second to get good-looking motion blur in the water.
Answer:
Here you must set the camera at lowest ISO. If the minimum aperture is still not enough, you must use a gray filter that reduces the light inlet.
Example 2:
You want to shoot with wide aperture to get the short depth of field on a sunny day. You have chosen the A/Aperture Value setting (Auto Aperture Priority) to get to choose f/2.8 aperture while the camera determines the shutter speed for you. The problem is that your images are overexposed at all times.
Answer:
A large aperture (comparable with a large pupil) on a sunny day means fast shutter speeds. Most cameras cannot capture images faster than 1/4000 or 1/8000 seconds, which may be too slow for the ISO number you selected. If you can, try to reduce the ISO to 100 or 50. If it is not enough, the only choice left is to buy a gray filter for the lens, which removes some of the sunlight.
Example 3:
You try to shoot indoors in a low light setting and has set the ISO at max, you have selected a large aperture and still think that the shutter speed is a bit too slow. You now turn on the flash and take the shot, however you notice that the picture becomes too bright. Despite the fact that you reduce the flash power all the images appear to be heavily overexposed.
Answer:
In extreme situations, the lowest effect of the flash can be too strong for the scene along with your choice of a high ISO number. The only opportunity to use flash in such a situation is to lower the ISO until you notice that the image becomes darker and then start to increase flash power again. From there, you will try to aim for a good balance between the ISO and the flash effect.
About the Author: Morris Scjomin (dslrlensauctions) has been a professional photographer for over 10 years, practicing exclusively in the field of portraiture, still life, and documentary images.
https://delhiphotographyclub.com/wp-content/uploads/2023/09/unnamed-44.jpg401570#iamdpchttp://www.delhiphotographyclub.com/wp-content/uploads/2020/03/Copy-of-Celebrate-Freedom-3.png#iamdpc2023-09-19 10:57:342023-09-19 10:57:35Tips for Using ISO Settings in Photography