Posts

Wildlife Photography: Tips for Better Composition

For a nature photographer, composition can be a daily challenge. In wildlife photography, the challenge is even greater. Not only are you trying to satisfy your own creative vision, but you also have to deal with a subject which may have no interest in having its photo taken.

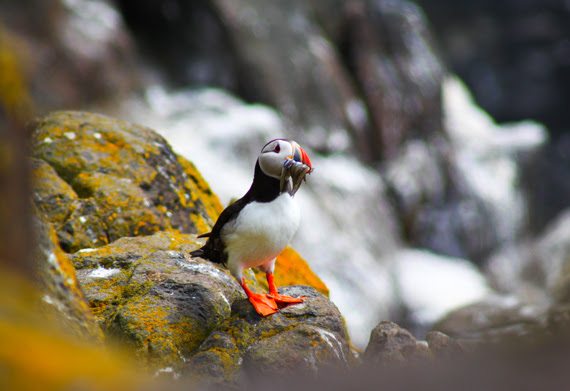
“A Very Cute Puffin” captured by PictureSocial member Ulka Nast

I can’t help you much with an uncooperative subject. Rest assured that with practice and experience, you will find that you become much quicker at composing and exposing a photo so that you get the shot before the critical moment passes. There are a couple of simple tips that can make things a little easier.

First, practice your photography in places where the animals are used to having people around and are less likely to become jittery at your presence. This does not have to be a zoo or other enclosure. Most national parks have campgrounds and picnic grounds where the wildlife is used to being around people and may even come closer looking for food. You have a much better chance of a shot if you can get close without frightening the subject away.

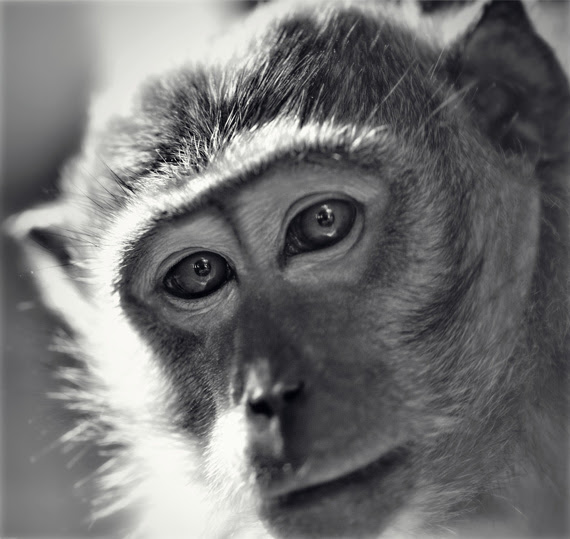
“Moment of a Monkey” captured by PictureSocial member Dietmar Chromik

Second, try to organize your exposure before you set up the shot. If the light is fairly constant, it is possible to point your camera in the right general direction and work out the best aperture and shutter speed settings for the photo. Then when you approach the subject, you can concentrate on composition without having to waste time working out your exposure.

These simple tips may help to take some of the frustration out of wildlife photography, but what about the composition itself? Many people simply don’t know where to start. If that sounds like you, don’t be discouraged. Like I said at the beginning, composition can be tough — even for a photographer with years of experience.

Let’s start by breaking it down into two categories: close-up and non-close-up photos.

In a close-up photo, the subject fills most of the frame.

A lot of people get in a tangle over whether to position their subject in the middle or to one side of the composition. In my experience, it is quite acceptable to have the subject right in the center, as long as you allow some head-room so it doesn’t appear too cramped within the confines of the composition. A central position is especially suitable when the subject is looking straight at the camera, but it often works just as well if the subject is facing a little to one side or the other.

The more space you have around the subject, the more you should consider putting it to one side or the other. You should be guided by the way the animal is facing. If it is looking to one side, position it a little towards the other side so it is looking toward the center of the frame. So, if your wildlife subject is looking right, position it a little to the left. Not too far — you don’t want half of your photo to feature nothing but empty space.

In a non-close-up, where the photo shows a lot more space around the animal, it becomes more critical that you use that space effectively. In situations where the animal is featured with a lot of background, it may be better to think of the picture as a landscape photograph, and compose it accordingly. Some of the tried-and-true techniques, like the Rule of Thirds, are a good way to help you position your subject within the overall frame of the picture.

For a landscape-style photo, it may look quite unbalanced to position your subject in the center of the picture. It is usually better to position it to one side or the other, and it is even more important to have the animal facing toward the center of the picture. The eyes of an animal subject can have a strong effect on the direction in a composition; we tend to look where they are looking. So if the animal is on the left and looking left, the visual flow of the composition will lead out of the picture instead of into it. If the subject is on the left and looking right, the viewer will follow the gaze of the subject into the center of the picture.

Naturally, it helps if there is something of interest in the center or to the right to catch the viewer’s attention and add interest to the composition. If the subject is looking into the composition, it makes sense that it is looking at something, not just at empty space. Almost anything will do — a tree, a beach, an impressive sky — as long as it adds impact to the composition. If there is nothing of interest to work with, you might consider zooming in closer, so there is less emptiness in the frame.

These simple guidelines are intended to do nothing more than give you some ideas. Nature is not governed by the rules of composition, and a wildlife photographer must be flexible to get the best result out of each situation. Above all, trust your own judgment — your own sense of visual balance — to create a satisfying composition. On the other hand, if you are struggling to get started, think back to these guidelines; if you can position your subject well, the rest of the composition will fall into place.

Tips for Using Patterns in Photography

Patterns are basically just repeated shapes, objects or colors either ordered in precise formations or just random designs scattered across a scene. The important thing about patterns is that they create images that are very pleasing to the eye and add a new dimension to your photos.

Patterns can be found everywhere in our world, from natural forms to our urban and industrial environments. Use them effectively in an image and you’ll create a photo that is dynamic and attracts the eye to the main subject or focal point. It will help you learn digital photography in interesting ways.

There are two ways to look at patterns. Take a bird’s eye view and look down on say a car park where you’ll see predictable rows of vehicles. Then the other way is to get in closer and look for not so obvious patterns like tire treads and grill patterns. If you really want to be successful in shooting a pattern make sure that you fill the whole frame so that the pattern extends form edge to edge.

So what are the most effective ways to use patterns in your photography? Here are a few ways.

1. Regular patterns

These are easily identifiable and make really outstanding images especially when there is a lot of color involved. Rows and rows of soldiers in red jackets make up a really great pattern formation. Be sure to try different angles and viewpoints to get more interesting shots. Regular patterns are made up of ordered rows of geometric designs or other objects of the same shape and size. Office blocks made up of rows of windows, rows of trees in an orchard or even a honeycomb.

2. Irregular patterns

These form an interesting image just by the irregular nature of the pattern. Objects that are randomly placed in a scene but fairly close together still reveal a sense of repetition. For example, a sky full of parachutists with colored parachutes above them or the leaves on a tree or even a forest floor with a carpet of leaves or acorns. None of these have regular patterns but they are still identified as patterns. Again by filling the frame edge to edge you will emphasize the actual pattern and contain it with great effect.

3. Multiple patterns

This is an interesting one and you’ll often see it in a wall of say an ancient building where different additions have been made. The regular pattern goes in one direction and changes as a new addition of bricks or tiles has been added hundreds of years later.

Brick paving leading up to a tiled wall will reveal a contrast between two types of patterns. Sometimes you’ll see this with the old and new as in a stone wall with a corrugated metal structure behind it.

4. Breaking the pattern

Picture this. A tray of thirty eggs all uniform in color and size with just one egg that has been broken revealing the bright yellow yolk. The uniformity of pattern is interrupted by the single broken egg. This doesn’t weaken the patterned effect as you would think but strengthens the overall image quite dramatically. These are created pattern breaks, but, by looking for them occurring natural is the challenge. For example, the field of red tulips in a Dutch field with just one yellow flower growing in the middle, or, a row of cars at factory storage facility with one color breaking the pattern. A fun experiment is creating your own pattern breaks with shells on the beach or acorns in a forest. You don’t have to have an object that is different to the rest. I shot a great image of a tiny shoot of a baby pine tree pushing its way through a carpet of brown pine needles. The green shoot contrasted against the brown needles and made an outstanding image.

As you learn digital photography, the idea of using patterns creates an opportunity for seeing with your photographic eye. Look for patterns within patterns as with the car park I mentioned earlier. Taking the time to see is vital when trying to create a great image. You will often find that in getting closer and looking for detail you’ll often spot a unique pattern opportunity.

Capturing Motion: The Art of Sports Photography

Sports photography is an exciting genre that allows photographers to freeze moments of
intense action and capture the raw emotions of athletes in motion. From the thrill of a
winning goal to the power of a perfectly executed slam dunk, sports photography
presents unique challenges and opportunities. In this article, we will explore the art of
sports photography and provide valuable tips to help you capture the essence of athletic
motion in your images.

To effectively capture motion in sports photography, a fast shutter speed is essential. Set
your camera to a high shutter speed to freeze the action and capture sharp images. A
shutter speed of 1/1000th of a second or faster is typically recommended, but adjust it
based on the specific sport and level of action you’re photographing.

Anticipating the action is key to capturing the peak moments. Familiarize yourself with the
sport you’re photographing, study the athletes’ techniques, and predict their
movements. By understanding the flow of the game or event, you’ll be better prepared
to capture those decisive moments.

Utilize burst mode or continuous shooting mode to capture a rapid series of images with a
single press of the shutter button. This increases your chances of getting the perfect
shot and ensures you don’t miss any critical moments. However, be mindful of your
memory card capacity and shoot in bursts wisely to avoid overwhelming yourself with
too many similar shots during post-processing.

Focusing on the eyes of the athletes adds depth and connection to your images. Set your
camera’s autofocus point to the athlete’s eyes or face to ensure they remain in sharp
focus. This technique draws viewers into the action and allows them to feel the intensity
of the moment.

Experiment with different angles to capture the dynamic energy and movement of the
athletes. Get low to the ground for a dramatic ground-level perspective or shoot from a
higher vantage point for a bird’s-eye view. Varying your shooting angles adds visual
interest and a unique perspective to your sports images.

Panning is a technique that involves tracking the subject’s movement while keeping it in
focus, resulting in a sharp subject against a blurred background. This technique adds a
sense of speed and motion to your images. Practice panning by following the athletes’
movement with your camera while using a slower shutter speed, usually around 1/60th
of a second or slower, depending on the speed of the subject.

Composition plays a crucial role in sports photography. Use the rule of thirds, leading lines,
and framing techniques to create visually engaging and balanced images. Position the
athletes off-center to allow space for them to move within the frame. Consider the
background and foreground elements to add depth and context to your shots.

Capturing the emotions of the athletes is equally important. Look for moments of
celebration, determination, or even disappointment. These emotional moments bring a
human element to your images and make them more relatable and impactful.

sports photography requires a combination of technical skill, anticipation, and
creativity to capture the essence of athletic motion. By mastering fast shutter speeds,
anticipating the action, using burst mode, focusing on the eyes, experimenting with
angles, utilizing panning, and paying attention to composition and emotion, you can
freeze the thrill and excitement of sports in captivating images. So, grab your camera,
head to the field, and embark on an exhilarating photographic journey to capture the art
of motion in sports photography.

Unlocking Creativity: The Beauty of Abstract Photography

Abstract photography is a captivating and expressive form of art that challenges
conventional rules and invites viewers to explore beyond the realm of literal
representation. By focusing on shapes, lines, colors, and textures, abstract photography
offers a unique way to convey emotions, evoke imagination, and engage the viewer’s
senses. In this article, we will delve into the world of abstract photography and discover
the beauty of capturing the unseen.

Abstract photography frees the photographer from the constraints of depicting reality as it
is. Instead, it encourages experimentation and allows for a more subjective
interpretation of the subject. By emphasizing form, texture, and color, abstract images
can be created from everyday objects, architecture, nature, or even a combination of
elements. It is all about finding the hidden beauty in the ordinary and presenting it in a
way that sparks curiosity and invites contemplation.

One of the key elements in abstract photography is composition. Instead of focusing on
traditional rules like the rule of thirds or leading lines, abstract compositions are often
more fluid and open to interpretation. Experiment with different angles, perspectives,
and framing techniques to create visually captivating and dynamic images. Play with
negative space, symmetry, patterns, and repetition to create a sense of balance and
harmony or introduce tension and contrast.

Color is another powerful tool in abstract photography. Bold, vibrant hues can create a
sense of energy and evoke strong emotions, while soft pastels or monochromatic tones
can convey a more subtle and serene mood. Pay attention to the interplay of colors
within your frame and explore how they interact and create visual harmony or contrast.
Don’t be afraid to experiment with color combinations that are unconventional or
unexpected.

Texture is another element that can add depth and interest to abstract images. Capturing
the roughness of a weathered surface, the smoothness of water, or the intricate details
of a textured object can create a tactile experience for the viewer. Pay attention to the
play of light and shadow to enhance the texture and bring it to life.

One of the joys of abstract photography is that it encourages a sense of exploration and
experimentation. Don’t be afraid to break the rules and challenge the norms. Allow your
creativity to guide you and embrace the unexpected. Look for details, shapes, and
patterns that others may overlook, and capture them in a way that highlights their
uniqueness and artistic value.

Post-processing also plays a significant role in abstract photography. Editing software allows
you to enhance colors, adjust contrast, and refine the overall mood of your images.
Experiment with different editing techniques to bring out the essence of your abstract
compositions and create a visual impact that resonates with your artistic vision.

abstract photography offers a creative and expressive outlet for
photographers to push the boundaries of visual representation. By focusing on form,
color, texture, and composition, abstract images can transcend the literal and evoke
emotions, spark imagination, and invite viewers to see the world in a new light. Embrace
the freedom to explore, experiment, and express your unique vision through the
captivating beauty of abstract photography.

Understanding Composition: Building Stronger Images

Composition is a fundamental aspect of photography that can make or break an image. It is the art of arranging elements within the frame to create a visually appealing and impactful photograph. A well-composed image grabs the viewer’s attention, guides their eyes, and tells a compelling story. In this article, we will explore the key principles of composition and how they can help you build stronger images.

One of the fundamental principles of composition is the rule of thirds. Imagine dividing your frame into a grid of nine equal sections with two horizontal and two vertical lines. The rule of thirds suggests placing your subject or key elements along these lines or at the intersections. This creates a sense of balance and visual interest, making the image more engaging to the viewer.

Leading lines are another powerful compositional tool. They are lines or shapes that guide the viewer’s eyes into the image, drawing attention to the main subject. Leading lines can be found in various forms such as roads, rivers, fences, or even architectural elements. By incorporating leading lines into your composition, you can create a sense of depth and add a dynamic quality to your image.

Consider the concept of negative space when composing your images. Negative space refers to the empty or unoccupied areas in your photograph. By purposefully incorporating negative space, you give your subject room to breathe and create a sense of simplicity and minimalism. This can help draw attention to the subject and convey a specific mood or emotion.

The concept of symmetry and balance is also important in composition. Symmetry occurs when elements in an image are evenly distributed, creating a sense of harmony. It can be found in natural or man-made structures, reflections, or patterns. Balanced composition creates a pleasing visual experience, making the image feel stable and satisfying to the viewer.

When composing your images, pay attention to the placement of the main subject or focal point. Placing the subject off-center, following the rule of thirds, often creates a more dynamic and visually pleasing composition. This technique adds visual tension and draws the viewer’s eyes into the frame.

In addition to these principles, consider the use of framing techniques to enhance your composition. Frames can be created by natural elements like arches, doorways, or tree branches, or even by deliberately using objects within the scene. Framing adds depth and layers to the image, drawing attention to the subject and creating a sense of context.

Experimentation is key when it comes to composition. Don’t be afraid to break the rules and explore unconventional approaches. Photography is an art form, and sometimes the most impactful images are the ones that challenge the norm and surprise the viewer.

Understanding composition is crucial for building stronger and more impactful images. By applying principles such as the rule of thirds, leading lines, negative space, symmetry, and balance, you can create visually appealing photographs that captivate the viewer’s attention. Remember to experiment, trust your instincts, and continue honing your compositional skills. With practice, you will develop a keen eye for composition and elevate your photography to new heights.