The Magic of Twilight

Part I – Civil Twilight

Whenever I photograph at a popular landscape photography location, I usually see a mass exodus of photographers as soon as the sun goes down. For many years, I was part of this exodus, as I believed the best light was gone as soon as the sun set. This was before I discovered the magic of twilight. Now, I see the sunset not as the end of my photo shoot, but as the beginning.

There are three stages of twilight – civil twilight, nautical twilight, and astronomical twilight. Each of these stages lasts about 30 minutes, though it can be longer or shorter depending on where you are on the planet and what time of year it is. You can determine the exact times each of these twilight stages occurs on many websites, including the astronomy section of WeatherUnderground. You can also find this information on apps like PhotoPills or The Photographer’s Ephemeris.

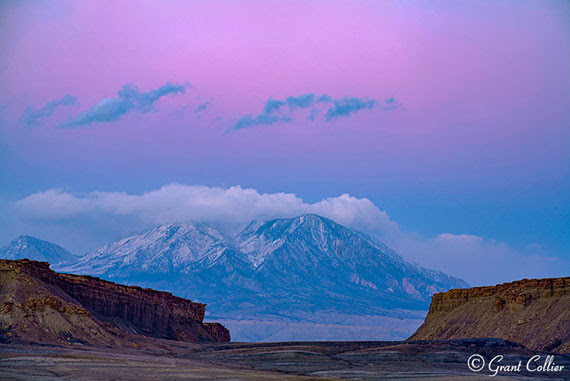
The Belt of Venus shines above Utah’s Henry Mountains. f7.1, 0.3 seconds, ISO 100

The first stage of twilight after sunset and the last stage before sunrise is known as civil twilight. It occurs during the time the sun is between 0 to 6 degrees below the horizon. During this time, you can often get vibrant colors in the sky, since a lot of light from the sun is scattered and refracted by the atmosphere. The clouds may have some of the bright orange or pink glow that you would see at sunrise or sunset. You can also capture images of Earth’s shadow, which is the shadow that Earth casts on its atmosphere. This shadow will usually appear with a bright pink band of sky above it, known as the Belt of Venus or the anti-twilight arch.

If you’re lucky, you may also see anticrepuscular rays rising towards the heavens shortly after sunset. These can appear at the spot where the sun set or directly opposite the spot the sun set.

Civil twilight is an excellent time to capture images of the moon and some of the brightest stars and planets. The moon will be visible throughout this time, while some stars and planets will be visible towards the end of civil twilight in the evening (or the beginning of it in the morning).

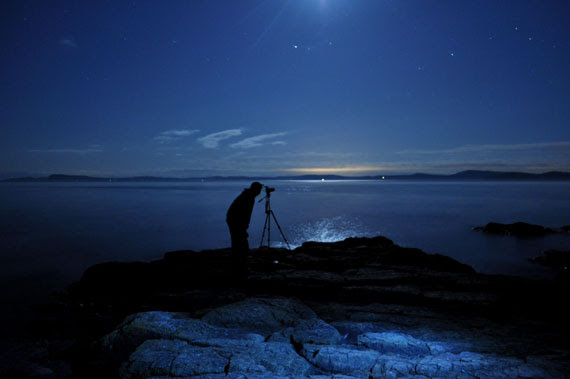
The period when the stars and planets are just visible is often referred to as the blue hour (even though it only lasts about 20 minutes in most locations). During this time, blue wavelengths of light from the sun are more easily refracted by the atmosphere back onto the land, making the scene appear bluer than usual. This effect is most pronounced near the end of civil twilight in the evening (or the beginning of civil twilight in the morning), though it is noticeable before and after this time.

You can capture some intriguing images during the blue hour. If you are photographing something that is already blue, like the ocean, it can further deepen the blues, giving a somewhat surreal effect to the photo. This may not be as desirable if you are photographing objects that aren’t blue, as it can give the appearance of a color cast across the image. In this scenario, you can increase the white balance temperature until the colors look better.

A partially-eclipsed moon rises above Balanced Rock in Utah. f5.6, 1/10 seconds, ISO 100

During civil twilight, it will usually be light enough to get good exposures using your camera’s exposure meter. However, you should check the histogram after you take your photos. Make sure the data extends to the right side of the histogram, without blowing out any highlights.

After civil twilight in the evening comes nautical twilight.

Part II – Nautical Twilight

Although civil twilight is a great time to capture landscape photos, the magic of twilight does not end there. After civil twilight in the evening (and before it in the morning) is a period known as nautical twilight.

This stage occurs from the time the sun is 6 to 12 degrees below the horizon. During this time, you can get unique images that convey the brief moment in time between the dark of night and the light of day.

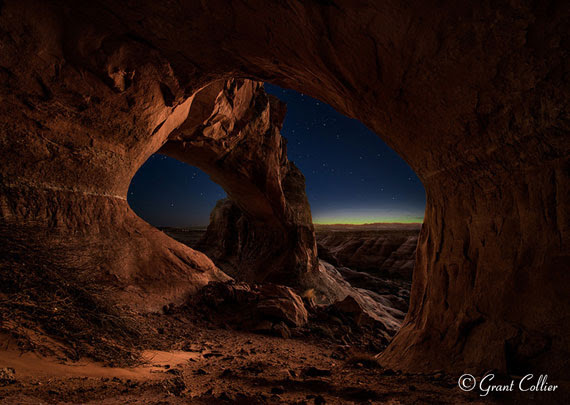
A remote natural arch is seen from a small cave in Utah. f2.8, 15 seconds, ISO 1000.

During nautical twilight, it will start to become too dark to use your camera’s exposure meter. You’ll need to switch to manual exposure on your camera. You should use the widest aperture you can, while still getting everything in focus. You’ll need to use longer and longer exposures (up to about 20 seconds) and start raising the ISO to properly expose your image and get data extending to the right side of your histogram.

It will start to look quite dark to the naked eye during nautical twilight. However, your camera can still capture light from the sun that is refracted by the atmosphere. You’ll usually get the best light on the land when facing away from the spot the sun set (or is about to rise). If, on the other hand, you face towards the direction of the sun, you can often get vivid colors in the sky above the horizon. If there was a vibrant sunset, some of the colors on the clouds might last until nautical twilight.

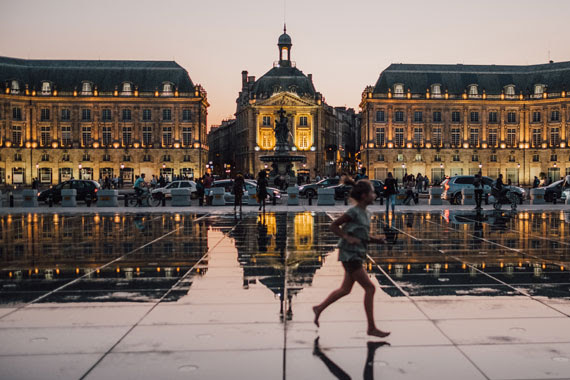
During the beginning of nautical twilight in the evening (or the end of it in the morning), it will often be light enough to get a good exposure of both the land and the sky with a single shot. As the light fades, you’ll likely need to combine two exposures if you want to get good detail in the land. You can take a longer exposure for the land and a shorter exposure for the sky and blend them in post-processing. I go into this in more detail in Collier’s Guide to Night Photography.

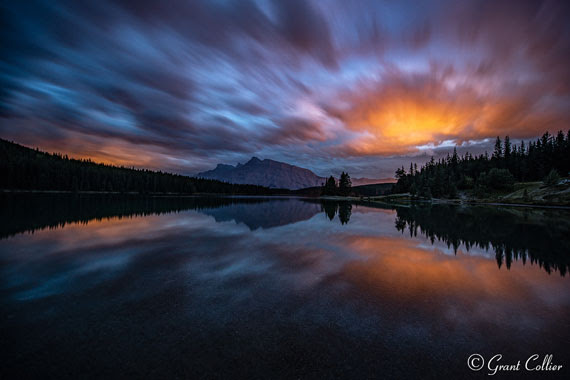
Light from a distant town bonces of clouds above Two Jack Lake in Canada. f2.8, 30 seconds, ISO 400.

The sky will appear blue throughout nautical twilight, and your camera will be able to capture quite a few stars in the sky. However, it won’t be dark enough to produce dramatic images of the Milky Way. To do this, you’ll need to wait until the next stage of twilight, called astronomic twilight.

Part III – Astronomical Twilight

After nautical twilight in the evening (and before it in the morning) is a period known as astronomical twilight. This stage of twilight occurs when the sun is 12-18 degrees below the horizon. The sky will appear almost completely dark to the naked eye, but there will still be some light from the sun refracted through the atmosphere that can be picked up by a camera.

At the beginning of astronomical twilight in the evening, the sky will still have a bluish color to it. If there is no moon out, the sky will fade to purple and then to black at the end of twilight. There may also be some reds or yellows in the direction the sun set (or is about to rise).

If there is no moon or a thin crescent moon, the skies will become sufficiently dark that you will be able to capture many stars and the Milky Way in your images. If there is a brighter moon out, the light from it will likely overpower any light refracted through the atmosphere from the sun. Your images will look about the same as photos taken under a moon in the dark of night – the sky will appear blue, the foreground will be lit up, and some stars will be obscured.

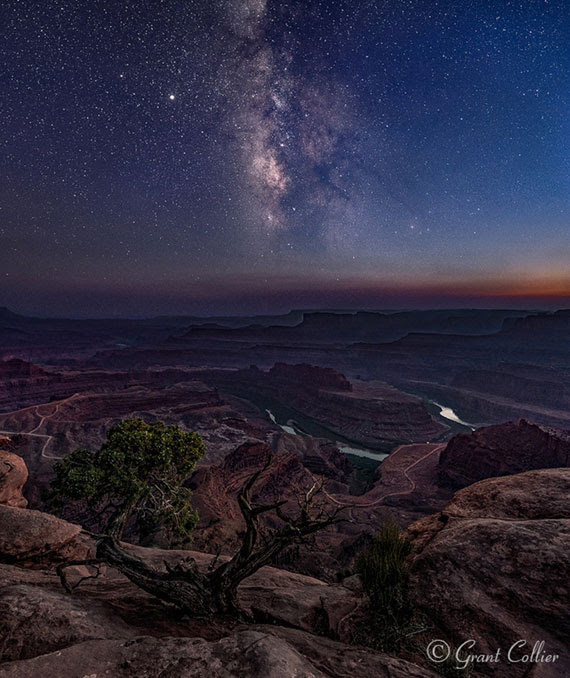
The Milky Way rises above Dead Horse Point in Utah. Stacked images, f1.8, 13 seconds, ISO 1600.

Even if there is no moon out, you can still get a little light on the foreground if you are facing away from the spot the sun set (or is about to rise). However, unless you are photographing something with a very bright, reflective surface, you’ll probably need to illuminate the foreground with a flashlight or stack multiple exposures, as described in my book Collier’s Guide to Night Photography, to get good detail throughout the image.

You will need to use a manual exposure setting to capture photos during astronomical twilight. You should generally use the widest aperture on your lens and a higher ISO setting of around 1600 to get good exposures. Your shutter speed can be set using the rule of 500 to keep the star trails to a minimum. Just take 500 divided by the focal length of your lens to get the exposure time in seconds (for cropped sensors, you’ll need to multiply by the crop factor of your lens to get the effective focal length). For example, if you use a 24mm lens, you would take 500 / 24 = 20.8. So 20 seconds would be your exposure time.

Fortunately, you won’t have to stop shooting after the end of astronomical twilight in the evening. There will no longer be light refracted through the atmosphere, but you can often get some green and red color in the sky from airglow. The skies will also be at their darkest, making it a great time to shoot the Milky Way. There really is no bad time to shoot at night. You can take images as soon as the sun sets and keep shooting as long as you want, while the light of day fades into the blackness of night.

How to Focus a Camera in the Dark

If somebody asked me about some of the difficult scenarios to work in as a photographer, working at night time would definitely make it to the top of the list. But with the challenge in place, the results that you can get from night time photos are truly amazing. The world out there appears kind of different at night. This gives you an opportunity to create photographs with a unique look. And that’s exactly what makes night photography a challenge worth pursuing.

One of the biggest hurdles you will come across when photographing at night time is focusing. With a minimal amount of light around, the sensor in any camera will struggle to detect any contrast. This is why focusing gets so difficult. So, it becomes important that you’re aware of some techniques to help your camera focus better at night.

Use Center Focusing Point with Single Servo

If you are not comfortable getting out of autofocus mode, try changing the autofocus area to single, and use the center autofocus point. Since the center autofocus point is more precise and sensitive than other focusing points, this can increase your chances of grabbing focus. And to prevent the lens from hunting around, set the drive the single servo. This way, once the camera locks focus, it won’t hunt further.

Manual Focus Works Best

If autofocus fails continuously, it is best to take matters into your own hands by turning the focusing mode to manual. Switch the focusing mode to manual either with a switch on the lens or through the camera menu. Then, using the focus ring on the lens, you can control where the lens needs to focus.

Use the Rear LCD

With the camera set to focus manually, switch your camera over to live view instead of using the viewfinder. This will allow you to use the digital zoom feature and ensure that you nail your focus.

Focus Peaking

Many modern cameras come with a focus peaking option that overlays the area that’s in focus with some color. This makes it much easier to judge whether the image is in focus or not. To get the most out of this feature, use it in conjunction with manual focus and live view.

Use Artificial Lighting Before the Shot

If the scene or your subject is close by, use some artificial source of light like a flashlight to light up a small portion. Then, you can either focus on that portion manually or by using the autofocus feature. If there’s enough contrast, autofocus should work seamlessly.

From Photoshop to AI: Evolution of the Photography Industry

The last few decades have witnessed dramatic shifts in the photography industry, evolving from the pure artistry of capturing the perfect shot to a domain replete with cutting-edge technology. This evolution was ignited by the introduction of Photoshop, and today, it is being further accelerated by artificial intelligence (AI) and synthetic photography.

The Photoshop Revolution

The launch of Adobe Photoshop in 1989 was a monumental leap for the world of photography. This game-changing software moved image manipulation into the digital realm, opening up an expansive universe of creativity and innovation.

Before Photoshop, photographers had to strive for perfection during the actual shoot, with only limited ability to modify the result afterwards. Image retouching and editing were labor-intensive tasks, usually involving a darkroom, chemicals, and skilled hands. Photoshop made these processes significantly easier and more accessible, giving photographers the power to alter reality, create visual illusions, and artistically enhance their images at the click of a button.

One of the key ways Photoshop revolutionized the industry was through democratizing access to image editing. Anyone with a computer could now potentially learn and practice sophisticated photo manipulation techniques. Photoshop became a linchpin in industries ranging from fashion to advertising, from journalism to fine art, giving birth to new roles and professions, such as graphic designers and digital artists.

Moreover, Photoshop initiated a critical dialogue about the ethics and authenticity in photography, challenging the age-old saying, “the camera never lies.” The power to manipulate images to such an extent stirred debates about the representation of reality in photography, altering our understanding of photographic truth.

The AI and Synthetic Photography Paradigm Shift

While Photoshop was a transformative force in the late 20th century, the advent of AI and synthetic photography in the 21st century is redefining the boundaries of the photography industry yet again.

AI-driven algorithms can now automate many of the tasks previously performed by photographers and photo editors. These tasks include adjusting lighting and color balance, recognizing and tagging subjects, enhancing image quality, and even composing an image or predicting the best moment to capture a shot. AI has also given rise to ‘computational photography’, a field that uses algorithms to enhance or extend the capabilities of digital photography.

Synthetic photography, on the other hand, pushes the envelope even further. It involves the creation of realistic images purely from digital or virtual elements. Artists and photographers can now fabricate a scene in three dimensions, set the lighting and weather conditions, pose their virtual subjects, and snap a photo—all within a virtual space. It’s a brave new world that significantly blurs the line between what’s real and what’s artificial, giving creatives an unprecedented level of control and flexibility.

However, just like with Photoshop, these technological advancements also come with ethical considerations. The ability to generate hyper-realistic images synthetically can have implications on truth and deception in visual communication. Moreover, as AI starts to automate more tasks, the industry needs to redefine the roles of photographers and image editors, adding a layer of complexity to the discussion about AI and job displacement.

Conclusion

From Photoshop’s democratization of image editing to AI’s automation of photographic tasks and synthetic photography’s creation of virtual worlds, the evolution of photography has been extraordinary. Each technological leap has not only expanded the creative possibilities for photographers and artists but also sparked valuable discussions about the ethics of image manipulation and the future of the profession.

As we move further into the age of AI and synthetic photography, it’s crucial to navigate these technologies responsibly, acknowledging their potential while being mindful of their ethical implications. In doing so, we can ensure that photography remains a powerful medium of authentic artistic expression and storytelling in the digital age.

Rain, Reflections, and the City: Urban Photography on Wet Days

Often seen as an inconvenience, rainy days can in fact be a goldmine for photography enthusiasts, particularly those who love to capture urban landscapes. With the right techniques, what could be a gloomy, wet day transforms into a playground of vibrant reflections, textures, and strikingly beautiful scenes. Here are some essential tips to make the most of your rainy day urban photography:

1. Gear Up

First and foremost, protecting your camera gear is a priority. There are many weather-sealed camera bodies and lenses available on the market, but if you don’t own one, don’t worry. A rain cover for your camera will do just fine and is usually quite affordable. For a makeshift solution, even a plastic bag can be useful, provided you handle your equipment carefully. Don’t forget an umbrella or a waterproof jacket to keep yourself dry and comfortable.

2. Embrace Reflections

One of the most spectacular things about photography on a rainy day is the appearance of reflections. Wet surfaces, puddles, and glass panes become mirrors reflecting the city’s life in a different perspective. Reflections can bring a surreal and artistic touch to your photos. Look for those perfect puddles and use them to create a dramatic impact by including city structures, lights, and even pedestrians.

3. Look for Details

Rain transforms the ordinary into the extraordinary. Raindrops on a railing, wet footprints on the pavement, beads of water on a café window – these details may seem mundane but can add depth to your photography. Focusing on these minute details can give your viewers a fresh perspective on the familiar urban environment.

4. Play With Light

Rainy days might seem dark and gloomy, but they are filled with unique lighting opportunities. The overcast sky acts as a giant diffuser, providing a soft, even light that’s perfect for capturing the city’s character. The vibrant city lights become even more pronounced in the rain, especially at dusk or night. The contrasting lights and the dark environment create high drama and ambiance in your images.

5. Capture Movement

The hustle-bustle of the city is amplified on rainy days. People dashing with umbrellas, vehicles splashing water, raindrops trickling down window panes – these movements can add a dynamic touch to your photos. Using a slow shutter speed will let you play around with motion blur, conveying a sense of speed and urgency that aligns with the mood of a rainy day.

6. Experiment with Black and White

Black and white photography and rainy days make for a potent combination. It brings out the mood, contrasts, and textures in a more pronounced manner. Particularly in an urban setting, black and white can amplify the timeless character of the cityscape, making your photographs dramatic and intense.

7. Post-Processing

Finally, don’t forget the power of post-processing. You can enhance the moodiness of your rainy day pictures by adjusting the contrast, sharpness, and saturation. Experimenting with various filters can also highlight the different elements you’ve captured.

Rainy days offer a unique canvas for your urban photography. While the rest retreat indoors, it’s your chance to step out and explore the city from a refreshed and renewed perspective. Happy shooting!

Tips for Using Patterns in Photography

Patterns are basically just repeated shapes, objects or colors either ordered in precise formations or just random designs scattered across a scene. The important thing about patterns is that they create images that are very pleasing to the eye and add a new dimension to your photos.

Patterns can be found everywhere in our world, from natural forms to our urban and industrial environments. Use them effectively in an image and you’ll create a photo that is dynamic and attracts the eye to the main subject or focal point. It will help you learn digital photography in interesting ways.

There are two ways to look at patterns. Take a bird’s eye view and look down on say a car park where you’ll see predictable rows of vehicles. Then the other way is to get in closer and look for not so obvious patterns like tire treads and grill patterns. If you really want to be successful in shooting a pattern make sure that you fill the whole frame so that the pattern extends form edge to edge.

So what are the most effective ways to use patterns in your photography? Here are a few ways.

1. Regular patterns

These are easily identifiable and make really outstanding images especially when there is a lot of color involved. Rows and rows of soldiers in red jackets make up a really great pattern formation. Be sure to try different angles and viewpoints to get more interesting shots. Regular patterns are made up of ordered rows of geometric designs or other objects of the same shape and size. Office blocks made up of rows of windows, rows of trees in an orchard or even a honeycomb.

2. Irregular patterns

These form an interesting image just by the irregular nature of the pattern. Objects that are randomly placed in a scene but fairly close together still reveal a sense of repetition. For example, a sky full of parachutists with colored parachutes above them or the leaves on a tree or even a forest floor with a carpet of leaves or acorns. None of these have regular patterns but they are still identified as patterns. Again by filling the frame edge to edge you will emphasize the actual pattern and contain it with great effect.

3. Multiple patterns

This is an interesting one and you’ll often see it in a wall of say an ancient building where different additions have been made. The regular pattern goes in one direction and changes as a new addition of bricks or tiles has been added hundreds of years later.

Brick paving leading up to a tiled wall will reveal a contrast between two types of patterns. Sometimes you’ll see this with the old and new as in a stone wall with a corrugated metal structure behind it.

4. Breaking the pattern

Picture this. A tray of thirty eggs all uniform in color and size with just one egg that has been broken revealing the bright yellow yolk. The uniformity of pattern is interrupted by the single broken egg. This doesn’t weaken the patterned effect as you would think but strengthens the overall image quite dramatically. These are created pattern breaks, but, by looking for them occurring natural is the challenge. For example, the field of red tulips in a Dutch field with just one yellow flower growing in the middle, or, a row of cars at factory storage facility with one color breaking the pattern. A fun experiment is creating your own pattern breaks with shells on the beach or acorns in a forest. You don’t have to have an object that is different to the rest. I shot a great image of a tiny shoot of a baby pine tree pushing its way through a carpet of brown pine needles. The green shoot contrasted against the brown needles and made an outstanding image.

As you learn digital photography, the idea of using patterns creates an opportunity for seeing with your photographic eye. Look for patterns within patterns as with the car park I mentioned earlier. Taking the time to see is vital when trying to create a great image. You will often find that in getting closer and looking for detail you’ll often spot a unique pattern opportunity.