Camera RAW Photo Editing Tip

When asked, most photographers out there will insist that shooting RAW is the way to go. For image makers looking to avoid the destructive potential of a compressed and automatically “enhanced” JPEG, there’s no question concerning which format reigns supreme. It’s easy to think of a RAW file as a digital negative – regardless of the changes you apply in post production, the original image will remain accessible.

That’s not to say that the RAW file is perfect. Unfortunately, there isn’t a standard in place for the file format that’s been adopted by the major camera companies. Though .NEF and .CR2 files are both RAW file formats, they record the uncompressed, unprocessed information of an image file differently. This consequently leads to difficulty translating RAW files into certain software.

For this reason, the Adobe Camera RAW plug-in is a godsend. Capable of processing any RAW file, it comes preinstalled with the purchase of programs such as Photoshop and After Effects. As most people know, the program allows users to make basic adjustments to image qualities such as clarity, tonality, and color. What many people do not realize is that it’s possible to apply quick masks in Camera RAW. All it takes is a little bit of work with the Adjustment Brush (K).
When you have the Adjustment Brush options open, use the sliders to lock in the changes you’d like to make. Then, scroll down to the brush options to determine options such as the size and feathering (radial sharpness) of the brush. Once you’ve made those decisions, just “paint” in the areas you would like the mask to be applied. You may want to check the Auto Mask box at the bottom of the control panel, which can detect major shapes and elements within a photograph to create a more precise mask.

Tutorial: How to Reduce Background Haze with Masking

You may wonder, “Why must I be concerned with photo editing and, in particular, using masks when photo editing?”

Here is a very short and direct answer:

“99% of the very best photographs that you see around you have been edited using masks… and the other 1% were probably shot on film.”

If you want to compete with your fellow photographers, this is a skill that you need to learn.

Fortunately, once you understand how it works; it’s not that hard, and, in fact, it adds an entirely new level of photographic fun to your activity.

There are many different ways that masks can be applied to your photos.

For the sake of this discussion, let’s examine a masking technique that is very common among users of Lightroom and Photoshop.

That technique is the “graduated filter”. Perhaps you didn’t even realize that a mask was involved with the graduated filter?

The graduated filter is commonly used to bring back some drama to a sky that is overexposed. It does this by allowing edits to affect the sky while everything else is unaffected.

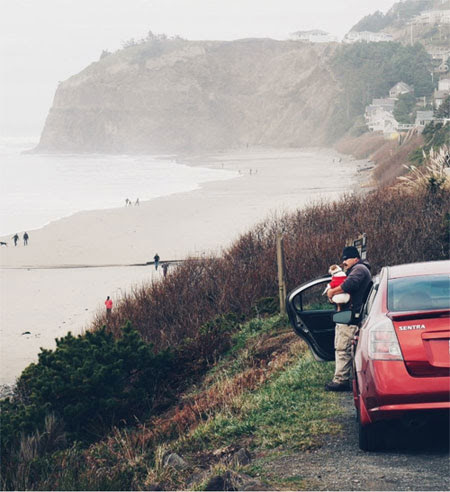
This photograph is a classic example of how you can use a mask to improve your photography.
Due to atmospheric haze, the background is quite washed out compared to the foreground. I am going to show you how the use of a simple mask can even out that exposure level for improved contrast and color from foreground to background.

For my example, I’ll be using the ACR (Adobe Camera Raw) window in Photoshop. However, it works exactly the same in Lightroom and most other editing programs.

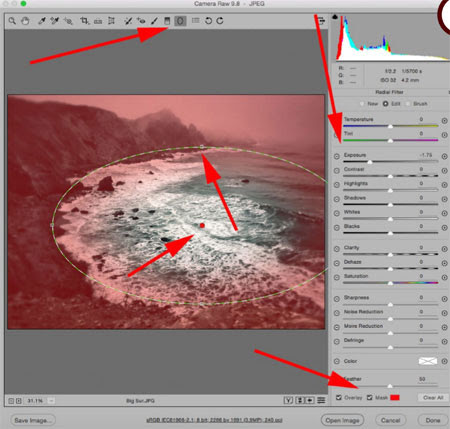
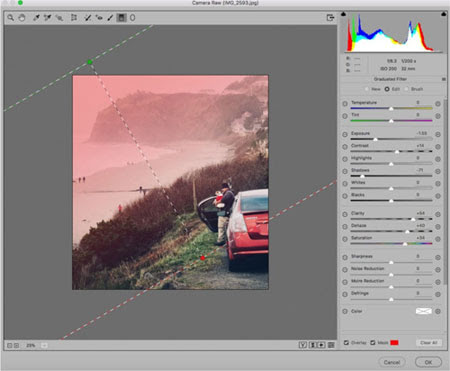
I selected the graduated filter. You can see the darkened “graduated filter icon” at the very top of the screen capture.
In this case, my horizon line (from foreground to background) is at an angle. So, I started in the upper left corner and dragged down to the lower right corner.

Before dragging the graduated filter across the picture, I checked “overlay” and “mask” in the lower right corner of the workspace. This allowed me to see the placement of the mask.

When you look at the image, the “red area” indicates where the mask has been placed. The tricky part with masking is knowing what part of the image will be affected. In this case, the red (masked) area will be affected by the changes made in the toolbox. In other uses of masks, the red area may be the area that is unaffected.

You have to learn how each masking activity works.

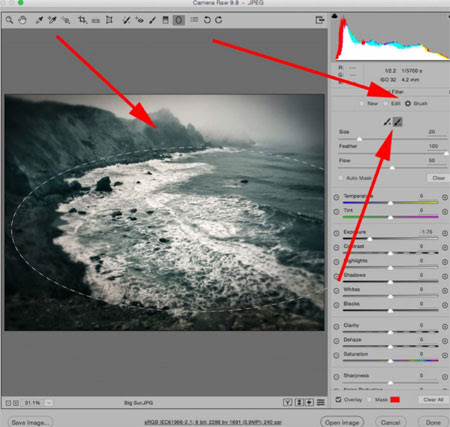
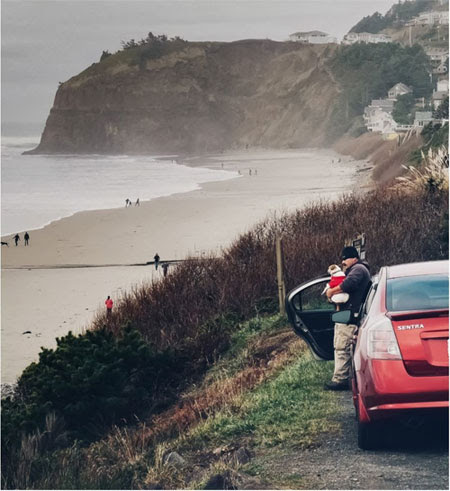
After I was happy with the mask placement, I unchecked the “overlay” and “mask” boxes so that I could see how my edits were affecting the picture.
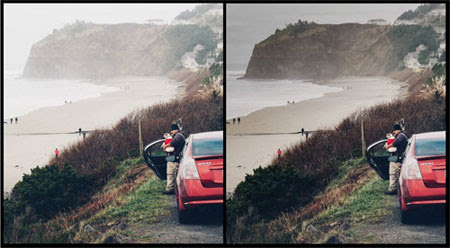
As you can see, the use of a mask created quite a dramatic difference on the background.
 

This example is a very simplistic use of masking. With masks, your creativity can become unlimited.

If you’d like to learn exactly how to improve your photography through the use of masks, you may want to look into the in-depth Understanding Masking please join our Photoshop workshop

When & Why to Use Exposure Compensation

For those of you getting used to new cameras, fully understanding exposure compensation with snow on the ground outside is a great place to start.

Ever wished you had a better control over exposure when taking photos? 
 
Exposure compensation is a useful technique that allows you to quickly fix exposure issues when taking photos in semi-manual modes like Aperture-Priority, Shutter-Priority and Program Mode.

Exposure compensation allows you to incrementally change the exposure around the default settings suggested by the camera after metering the scene.

It’s usually needed when there are excessive bright or dark regions in a scene. Dialing in an exposure compensation corrects the exposure according to your requirement.

If your image turns out darker than you had wanted (an underexposed shot), a positive exposure compensation can fix the exposure. Likewise, for overexposed shots, a negative exposure compensation is needed.

The amount of exposure compensation you need would depend on the scene and the lighting.

Take a look at the scene below: 

A scene that is predominantly white, like a snow covered landscape, can fool your camera into capturing the snow as grey in color by using the default, metered exposure settings (which is what the camera is programmed to do, and which works fine in most cases). An exposure compensation of about +2 lets you capture the snow as white.

It’s something to always remember when out taking photographs.

Understanding Metering Modes on Your Camera

An underexposed or an overexposed photo results from using incorrect settings. The exposure settings are determined using a process called metering, based on the metering mode that is selected.

Having an understanding of the metering modes can give you much better control over the image exposure. There are three main metering modes that you should know.
1. Evaluative / Matrix metering – The default mode on most DSLRs. It measures light across the whole frame. Great for evenly lit scenes, with not a lot of variation in lighting. 
2. Spot metering – This is the most accurate – yet hardest mode to master. It reads the intensity of the light over a small circular area in the center of the image. Great for scenes with varied lighting and when utilizing Manual Mode. 

3. Center-weighted average metering – This mode meters the light across the whole picture but places greater emphasis on the center of the image. Great for portraits, since it leaves any highlights, or shadows, in the corners of the image out of the equation.

Fixing Exposure Extremes as a Photographer.

What is “Clipping” in photography? 

When the brightest tones in your photograph are pure white, and they contain no image detail at all, this means the highlights have been “clipped” off. 

Conversely, when the darkest tones in your photograph are pure black, and they contain no image detail at all, this means the shadows have been “clipped” off. 

Clipped means that those areas of the photograph are outside of the recordable dynamic range, and they cannot be reproduced properly.

You can check for “clipping” by looking at your Histogram. In this image, we are using Lightroom as an example. This description would also apply to Photoshop and Adobe Elements as well. If you are using another editing program – one that shows the Histogram- then these tips will help you as well. 

The Histogram (in Lightroom) is located in the upper right corner of the “desktop workspace”. 

It typically looks something like a mountain range with peaks and valleys. 

A Histogram’s purpose is to display all of the tones located within a photograph using a numerical value on a graph. 

Concentrate on the two red arrows that are pointing upward at the Histogram. 

The left arrow points out the shadow end of the Histogram. Take notice that the “mountain range” (aka “the graph”) drops down to the baseline before it reaches the red arrow. 

This means that the shadow end is not clipped. All of the shadows that you see in the image preview window have recordable detail. 

The right arrow points out the highlight end of the Histogram. Take notice that the “mountain range” (aka “the graph”) is cut off before it reaches the red arrow. It never drops down to the baseline. 

This means that the highlight end is clipped off, the result being that not all of the highlights that you see in the image preview window will have recordable detail. 

Now, turn your attention to the two red arrows at the top of the Histogram. At the tips of those two arrows you will see two small icons. 

These icons are buttons. By hovering your cursor over them and doing a left click on your mouse, you can turn on, or off, a “clipping indicator”. 

The left icon is the “shadow clipping indicator”, and the right icon is the “highlight clipping indicator”.

In the image above, the clipping indicators are turned on. 

Look at the image preview window. 

The shadow clipping indicator would appear as a “blue overlay” wherever the clipping occurs on the image. 

We know from the Histogram that this image has no clipping in the shadow end, so we aren’t seeing any blue overlay. 

The highlight clipping indicator appears as a “red overlay” wherever the clipping occurs on the image. 

We know from the Histogram that this image does have clipping in the highlight end, so we are seeing a red overlay in those areas. (The far left red arrows are pointing at the areas of clipping.) 

Now that we have identified the clipping, and where it is located, we can attempt to fix it.