The Most Photogenic Clouds and Where to Find Them

Clouds are nature’s masterpiece on the canvas of the sky. Their constantly evolving forms and ethereal presence create some of the most captivating images for photographers. Whether you’re a seasoned pro or a beginner, capturing clouds can elevate your photography game. Here’s a guide to the most interesting types of clouds to photograph and the best places to find them.

1. Cumulus Clouds:

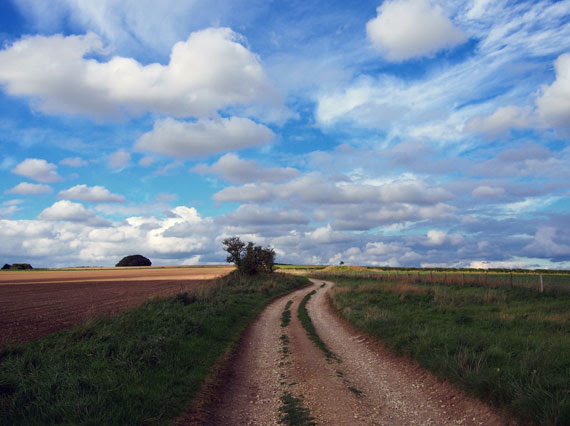
  • Appearance: These are the classic, fluffy white clouds that often resemble cotton balls. They are relatively low in the sky and have well-defined edges.
  • Best for: Daytime landscapes, creating contrast against a deep blue sky.
  • Where to find them: Almost everywhere, especially in fair weather. Mid-day is often a good time.
  • Formation: Cumulus clouds form due to vertical convection currents caused by warming at the Earth’s surface. As warm air rises, it cools and condenses into these puffy clouds.
2. Cirrus Clouds:

  • Appearance: Wispy and thin, cirrus clouds often look like feathery strokes painted high in the sky.
  • Best for: Sunsets and sunrises, as their ice crystals can reflect vibrant colors.
  • Where to find them: They are high-altitude clouds, so they are pretty much everywhere. Look up on clear days.
  • Formation: Cirrus clouds form at high altitudes where the atmospheric pressure is low. Here, water vapor freezes into ice crystals. They are often formed from the outflow of other clouds or can be remnants of cumulonimbus clouds.

3. Stratus Clouds:

  • Appearance: These clouds form uniform layers, often covering the sky like a blanket, leading to overcast conditions.
  • Best for: Creating moody, atmospheric shots. Great for black and white photography.
  • Where to find them: Common in coastal areas or during foggy mornings inland.
  • Formation: Stratus clouds are typically formed through the gentle lifting of a large, relatively flat air mass. This lifting can be due to subtle features in the landscape or even an incoming weather front. They can also form from fog lifting off the ground.
4. Cumulonimbus Clouds:

  • Appearance: Towering giants, they can develop anvil tops and can produce severe weather, including thunderstorms.
  • Best for: Capturing dramatic weather events like lightning or a storm’s approach.
  • Where to find them: Regions with frequent thunderstorms, like the American Midwest or tropical areas during the monsoon.
  • Formation: Cumulonimbus clouds are the result of vigorous convection currents. These are initiated by intense heating at the Earth’s surface. The warm air rises rapidly, and as it does, it cools and condenses. If the rising air is moist and unstable enough, it can lead to the formation of these towering storm clouds.

5. Mammatus Clouds:

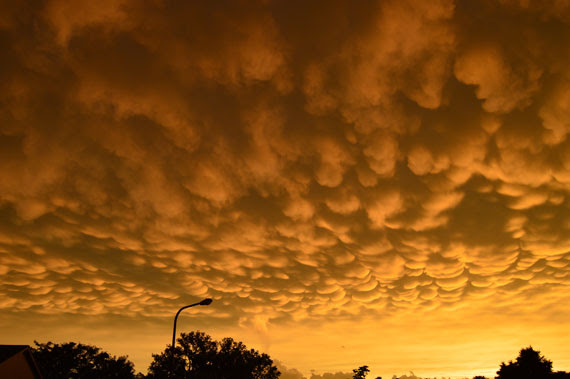
  • Appearance: They are bubble-like pouches hanging underneath the base of a cloud, often associated with severe weather.
  • Best for: Adding drama and intrigue to your photos.
  • Where to find them: Often seen after severe thunderstorms have passed.
  • Formation: The exact cause is still debated, but one theory suggests that they form when cold air sinks down, creating pockets contrary to the usual puffy cloud formation. They’re often associated with severe weather and can appear after a storm.
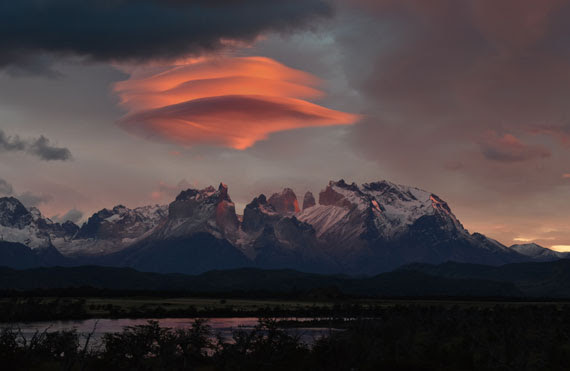
6. Lenticular Clouds:

  • Appearance: They resemble UFOs or lens shapes and form over mountains or other geographical features that disrupt the flow of the air.
  • Best for: Surreal landscapes, especially during sunset or sunrise when they can take on brilliant hues.
  • Where to find them: Mountainous regions like the Rockies or the Andes.
  • Formation: These form when moist air flows along the surface of the Earth and encounters obstructions like mountains or hills. These obstructions force the air to rise, and lenticular clouds form at the crest of the wave of rising air. Once the air passes over the obstruction and descends again, the cloud dissipates.
7. Nacreous (Mother of Pearl) Clouds:

  • Appearance: They shimmer with iridescent colors and form in the lower stratosphere over polar regions.
  • Best for: Ethereal, other-worldly shots.
  • Where to find them: Polar regions during winter, especially after sunset or before sunrise.
  • Formation: They form in the winter polar stratosphere at altitudes of 15,000–25,000 meters (49,000–82,000 ft). They’re made up mostly of ice crystals. The clouds’ iridescence is due to the diffraction of sunlight around the ice crystals.

Tips for Cloud Photography:

  • Golden Hour Glory: The time just after sunrise or before sunset provides a soft, golden light that can make clouds look especially breathtaking.
  • Use Filters: Polarizing filters can enhance the contrast between clouds and the sky.
  • Patience Pays: Cloud formations can change rapidly. Waiting can sometimes reward you with a magical shot.

General Principles of Cloud Formation:

The foundation of cloud formation is the Water Cycle. Here’s a brief overview:

  1. Evaporation: Sun heats the Earth’s surface, causing water to evaporate from oceans, lakes, and rivers into the atmosphere.
  2. Condensation: As the warm, moist air rises, it cools. When the air temperature drops to its dew point, the water vapor condenses into tiny droplets around particulates in the air, forming clouds.
  3. Precipitation: When these water droplets combine and become heavy enough, they fall as precipitation.

In essence, clouds form when warm, moist air rises and cools, causing the water vapor in the air to condense around tiny particles, such as dust or smoke. Different atmospheric conditions, temperatures, altitudes, and more can result in the various cloud formations we see in the sky.

The world is full of breathtaking cloudscapes waiting to be captured. With patience, the right timing, and a bit of luck, photographers can capture the ethereal beauty of clouds in all their glory. So the next time you’re looking up, remember, the sky isn’t the limit—it’s the canvas!

Shutter Speed Determination for Hand-held Landscape Photos

Now generally I recommend a tripod for landscape photography, however, I do shoot a fair bit of hand-held landscapes too and trust me, I have had more than my share of blurry photos in my 15 odd years of photography.

Is there anything worse than a Blurry Masterpiece?

In my opinion, there is nothing worse than zooming into the best shot of the day, the miracle shot that captured the moment perfectly, only to discover it’s blurry.

Ok, so how do we shoot hand-held in tough conditions and make sure our photos have a good chance of being sharp?

Shutter speed is critical when shooting without a tripod. We need to shoot fast enough so that any camera shake is not visible in our final photo.

But what shutter speed is fast enough to avoid camera shake?

Interestingly, it varies depending on the focal length of the lens you are shooting with.

Wide-angle lenses are much easier to get sharp hand-held photos than telephoto, as you will see below

The rule of thumb that I use is:

2 times the focal length you are shooting is a good minimum shutter speed as a guide. Of course, the faster – the better chance of a good result.

You may find that with modern stabilized cameras and lenses that you can go even lower, however, I feel that 2x the focal length is a good minimum to start at.

Now you might be thinking, “what on earth is he talking about”.

Hopefully, this clears it up:

  • 20mm lens: 2 x 20 = 1/40th of a second as your minimum shutter speed for a 20mm lens.
  • 50mm lens: 2 x 50 = 1/100th of a second as your minimum shutter speed for a 50mm lens.
  • 100mm lens: 2 x 100 = 1/200th of a second as your minimum shutter speed for a 100mm lens
  • 400mm lens: 2 x 400 = 1/800th of a second as your minimum shutter speed for a 400mm lens.

Of course, the faster the better, if you can.

This won’t guarantee sharp photos every time but it will get you on the right track as far as shutter speed is concerned.

Below are further tips for the perfect hand-held Landscape photo.

• Raise your ISO to achieve at least the minimum shutter speed above.
• Brace yourself against a solid object to reduce camera shake.
• Choose a lens or camera with Image Stabilization.
• Set your camera to multiple shot mode and fire 3-4 consecutive shots. Generally, camera shake is at its highest on the first photo as we press the shutter and will settle down in the 2nd-3rd-4th shots of the sequence.

Capturing Motion: The Art of Sports Photography

Sports photography is an exciting genre that allows photographers to freeze moments of
intense action and capture the raw emotions of athletes in motion. From the thrill of a
winning goal to the power of a perfectly executed slam dunk, sports photography
presents unique challenges and opportunities. In this article, we will explore the art of
sports photography and provide valuable tips to help you capture the essence of athletic
motion in your images.

To effectively capture motion in sports photography, a fast shutter speed is essential. Set
your camera to a high shutter speed to freeze the action and capture sharp images. A
shutter speed of 1/1000th of a second or faster is typically recommended, but adjust it
based on the specific sport and level of action you’re photographing.

Anticipating the action is key to capturing the peak moments. Familiarize yourself with the
sport you’re photographing, study the athletes’ techniques, and predict their
movements. By understanding the flow of the game or event, you’ll be better prepared
to capture those decisive moments.

Utilize burst mode or continuous shooting mode to capture a rapid series of images with a
single press of the shutter button. This increases your chances of getting the perfect
shot and ensures you don’t miss any critical moments. However, be mindful of your
memory card capacity and shoot in bursts wisely to avoid overwhelming yourself with
too many similar shots during post-processing.

Focusing on the eyes of the athletes adds depth and connection to your images. Set your
camera’s autofocus point to the athlete’s eyes or face to ensure they remain in sharp
focus. This technique draws viewers into the action and allows them to feel the intensity
of the moment.

Experiment with different angles to capture the dynamic energy and movement of the
athletes. Get low to the ground for a dramatic ground-level perspective or shoot from a
higher vantage point for a bird’s-eye view. Varying your shooting angles adds visual
interest and a unique perspective to your sports images.

Panning is a technique that involves tracking the subject’s movement while keeping it in
focus, resulting in a sharp subject against a blurred background. This technique adds a
sense of speed and motion to your images. Practice panning by following the athletes’
movement with your camera while using a slower shutter speed, usually around 1/60th
of a second or slower, depending on the speed of the subject.

Composition plays a crucial role in sports photography. Use the rule of thirds, leading lines,
and framing techniques to create visually engaging and balanced images. Position the
athletes off-center to allow space for them to move within the frame. Consider the
background and foreground elements to add depth and context to your shots.

Capturing the emotions of the athletes is equally important. Look for moments of
celebration, determination, or even disappointment. These emotional moments bring a
human element to your images and make them more relatable and impactful.

sports photography requires a combination of technical skill, anticipation, and
creativity to capture the essence of athletic motion. By mastering fast shutter speeds,
anticipating the action, using burst mode, focusing on the eyes, experimenting with
angles, utilizing panning, and paying attention to composition and emotion, you can
freeze the thrill and excitement of sports in captivating images. So, grab your camera,
head to the field, and embark on an exhilarating photographic journey to capture the art
of motion in sports photography.

DPC Spiti Trip Photo Review Session and Members Meetup

This give us immense pleasure to Invite you all DPC members for the DPC Spiti Trip Photo Review Session and Members Meetup this Saturday .

Spiti Travellers: Please get photos that you want to review and share with us in Pen drive, Selected pictures will also be featured on DPC website and DPC social Media posts .
Date : 23rd April 2022 
Time : 4 pm to 6 pm

Venue: DPC Lounge Shahpur Jat

For more info call
8826712162 or DM if interested!
For any queries:
hi@delhiphotographyclub.com

DPC PhotoBus Trip to SPITI 10th to 17th April 2022

DPC one more most amazing trip to Spiti

DPC PHOTOBUS TRIP TO SPITI

About Spiti

This time we are going to Spiti, During our trip we will witness and capture the most beautiful monasteries, landscapes and the local people.

It’s going to be an 8 days trip.

We will be covering everything by Tempo Traveller.Just Remember : We are going on a road trip and there will be ample opportunity to click good pictures. We will stop at places and spend time clicking and create good pictures.

Meeting point : SDA market (opp. IIT main Gate )

Date : 10th Apr 6.00 AM Sunday Morning
We are going by 9 seater Tempo Traveler

Itinerary

Day 1. 10 th Apr Delhi to Rampur Busher .

Day 2. 11 th Apr Rampur to Tabo

DAY 3: 12 th Apr Kaza- key- Dhankar

DAY 4: 13 th Apr Kibber- key and others

DAY 5: 14 th Apr Langza Komik Hikkim.

DAY 6: 15 th. Apr Kaza to Chandratal ( if way to Chandrataal is Open)

DAY 7: 16 th Apr Starting Back from Chandratal (If it’s Open )

and reaching Delhi on 17th Apr

Other Important Details

Stay: Will be on a twin sharing basis in a home stay environment. And you can opt for single sitting rooms wherever possible ( on extra charges)

Mode of travel: We will be traveling in an AC TEMPO traveller together.

Gear: You can carry tripods and wide angle lenses for cameras. Any camera is good for this trip so long as it is digital

Clothing: Please carry woollen clothes , comfortable shoes, take hats/caps, shades and sunscreen!Please carry winter clothing for 3-4 layers temp would be around 6-7 degree. Days are pleasant , Nights are a bit chilly.
Please carry a few edible items with you for munching like Dry Fruits , chocolates and nuts.

All the small bags and camera bags can be kept inside the tempo traveller and rest will go on the top of the tempo. So manage wisely. Please carry one small bag and your moderate size bag.
Fee (per person) : 32000 (including registration fee)

For DPC Members : 30000

Fee includes travel & group transfers, stay and meals

For more info call
8826712162 or DM if interested!
For any queries:
hi@delhiphotographyclub.com