Using Long Exposures in Landscape Photography

Have you looked at some of those amazing long exposure landscapes and thought that they are something very difficult to create? Long exposure photographs, of course, require a lot of effort, thought and planning put into them, but they are not so complicated as you think.

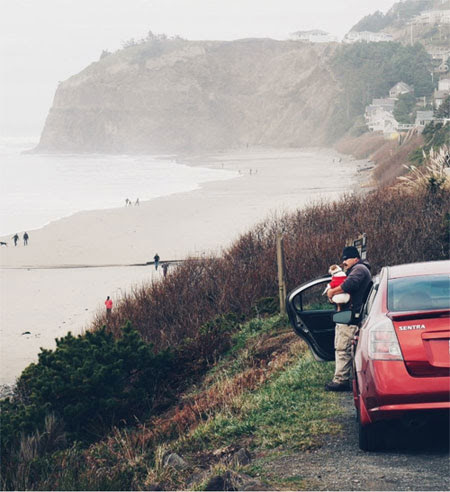
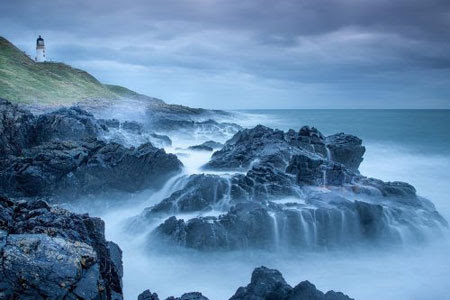
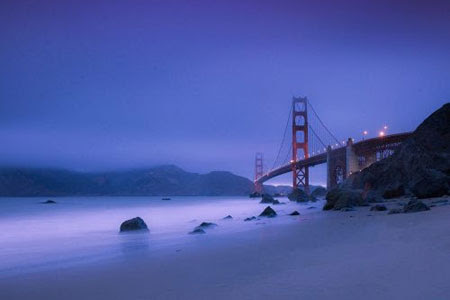
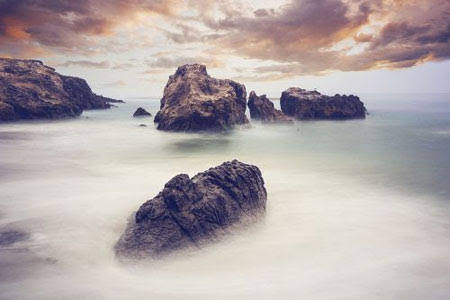
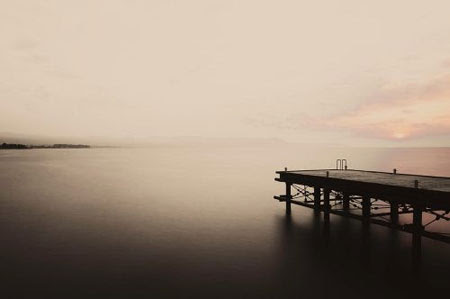
So, what is so different about long exposure landscape images? They are not static like those images you take using a faster shutter speed, but are dynamic in the sense they capture movement showing what has happened in a landscape over a period of time. It could be from a few seconds to minutes or even hours.

They are not static like those images you take using a faster shutter speed, but are dynamic in the sense they capture movement showing what has happened in a landscape over a period of time. It can be from a few seconds to minutes or even hours

Remember the three Ps. Practice and Patience along with good Planning are very important for creating some compelling long exposure landscape images. Here are some quick tips for you to get started.

Look out for a good location. Long exposure photography is where you capture movement. So look for places where there are natural moving elements like waves, waterfalls, rivers, fog, clouds, etc. Make sure you have some static elements like mountains, trees or rocks in the frame so that the movement makes sense and gives a meaning to the image.

The best time to shoot for longer exposures is the blue hour or golden hour. This is to get some beautiful colors in the sky and light on the elements. However, you can also use ND filters of varying strengths to extend your shutter speed and capture more movements.
Check out your composition. When framing moving elements, just like you would do for a landscape image, carefully choose a foreground, middle ground, and background to create powerful compositions. The composition should lead the viewer into the image and keep them hooked. When capturing cloud movement, look for the direction in which they move and frame the scene accordingly to get a visually appealing shot.
Gear and settings. Since you are dealing with longer shutter speed, you will need a camera that lets you shoot in manual mode, especially one with bulb mode for very long exposures. You will also need a wide angle lens, a sturdy tripod, and a remote shutter release to avoid any shake or vibration. Use the lowest ISO possible and aperture between f8 and f11 for sharper noise-free images.

With long exposure landscapes, the look and feel of the image depends on the shutter speed and the speed with which the elements in the frame move. So try various shutter speeds for capturing different amounts of movement in the image and choose what works best for you.

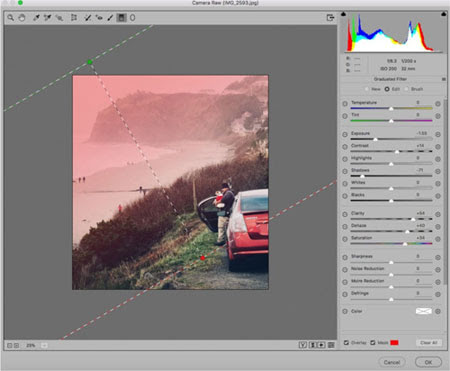
Shoot raw. This will help you work with so much data while post-processing. Raw captures a lot more information in the file than jpeg and let’s you do more in post-production without introducing unwanted “artifacts” that can ruin the image.

Now, these are the very basics of getting into long exposure landscape photography

6 Types of Portraits

There are several distinct types of portrait photographs you can create. Knowing these gives you a better understanding of how to approach a portrait shot and get the result you desire.

Here are 6 of the most common kinds of portraits you can photograph. The images are numbered accordingly:

1. Traditional

This is the most common type of portrait work. It’s created against a backdrop, and the subject generally looks directly at the camera. This style of work is most often used for business portraits, school pictures, church directories, baby pictures, and family portraits.

2. Lifestyle

Lifestyle portraits have become very popular in the last few decades. This type of work portrays the subject in a living situation. The key is to show the subject(s) enjoying their life. The activity is as important as the faces and the expressions. This style is often used in weddings, family portraits, engagement portraits, glamour work, and editorial photography.

3. Environmental

An environmental portrait is similar to a lifestyle portrait. The term environmental portrait is used primarily to describe work created for the editorial or business markets rather than families or weddings. An environmental portrait gives the viewer a sense of the person, their place, and how the two relate to each other.

4. Candid

Candid portraits are done on the fly without a lot of set-up. Sometimes the subject of the candid portrait isn’t even aware that the photographer is taking their photograph. One of the most difficult aspects to candid portraits is achieving a natural look when working with a subject. Almost any type of photography assignment can require candid portraits – weddings, families, children, or editorial work.

5. Glamour

This type of work requires all the skills previously discussed plus additional skills in the application of makeup and the styling of hair. Special attention must be placed on the selection of clothing, props, and posing.

6. Experimental and Abstract

Portraits in this genre are typically created for artistic purposes only and are often used as an interpretive view of the subject’s subconscious thoughts.

When/Why Enlarge or Upscale Your Photos?

Why Enlarge Your Photos?

It’s helpful to understand why you’d want to enlarge your photos before diving into the various ways you can do so. We agree that the base reason is that we want to take an image file with one resolution and increase it to a larger resolution, and that is the very definition of enlarging an image. So, what are some of the reasons for needing to enlarge, or upscale, a photo?

Heavy Cropping

Cropping is one of the most common edits photographers make during post-processing. It’s one of the first steps I take when editing my photography because my priority is to establish the photo’s composition. In some cases, I have to apply heavy cropping if my desired composition, or the primary focus point, is too small or far in the distance. That often happens when I don’t pair the ideal lens and focal length with the desired composition. As a result, my post-cropped photos tend to lose a lot of resolution, and upscaling is the only way to regain it.

Massive Printing or Displays

As you can imagine, the resolution requirements are strict for large digital billboards or ad campaigns, and sometimes photographers have to apply a significant upscale to meet their needs. The same upscaling requirements are valid for photographers who need to print their work for large displays.

Enlarging and Sharpening Mobile Photos

The state of mobile photography has come a long way over the past decade. I’m constantly amazed at what I can achieve with that slab of glass, metal, and circuity in my pocket. Despite some smartphones pushing the boundaries of megapixel counts with their sensors, the image file output often requires much work when upscaling to achieve a sharp larger resolution.

Camera RAW Photo Editing Tip

When asked, most photographers out there will insist that shooting RAW is the way to go. For image makers looking to avoid the destructive potential of a compressed and automatically “enhanced” JPEG, there’s no question concerning which format reigns supreme. It’s easy to think of a RAW file as a digital negative – regardless of the changes you apply in post production, the original image will remain accessible.

That’s not to say that the RAW file is perfect. Unfortunately, there isn’t a standard in place for the file format that’s been adopted by the major camera companies. Though .NEF and .CR2 files are both RAW file formats, they record the uncompressed, unprocessed information of an image file differently. This consequently leads to difficulty translating RAW files into certain software.

For this reason, the Adobe Camera RAW plug-in is a godsend. Capable of processing any RAW file, it comes preinstalled with the purchase of programs such as Photoshop and After Effects. As most people know, the program allows users to make basic adjustments to image qualities such as clarity, tonality, and color. What many people do not realize is that it’s possible to apply quick masks in Camera RAW. All it takes is a little bit of work with the Adjustment Brush (K).
When you have the Adjustment Brush options open, use the sliders to lock in the changes you’d like to make. Then, scroll down to the brush options to determine options such as the size and feathering (radial sharpness) of the brush. Once you’ve made those decisions, just “paint” in the areas you would like the mask to be applied. You may want to check the Auto Mask box at the bottom of the control panel, which can detect major shapes and elements within a photograph to create a more precise mask.

Tutorial: How to Reduce Background Haze with Masking

You may wonder, “Why must I be concerned with photo editing and, in particular, using masks when photo editing?”

Here is a very short and direct answer:

“99% of the very best photographs that you see around you have been edited using masks… and the other 1% were probably shot on film.”

If you want to compete with your fellow photographers, this is a skill that you need to learn.

Fortunately, once you understand how it works; it’s not that hard, and, in fact, it adds an entirely new level of photographic fun to your activity.

There are many different ways that masks can be applied to your photos.

For the sake of this discussion, let’s examine a masking technique that is very common among users of Lightroom and Photoshop.

That technique is the “graduated filter”. Perhaps you didn’t even realize that a mask was involved with the graduated filter?

The graduated filter is commonly used to bring back some drama to a sky that is overexposed. It does this by allowing edits to affect the sky while everything else is unaffected.

This photograph is a classic example of how you can use a mask to improve your photography.
Due to atmospheric haze, the background is quite washed out compared to the foreground. I am going to show you how the use of a simple mask can even out that exposure level for improved contrast and color from foreground to background.

For my example, I’ll be using the ACR (Adobe Camera Raw) window in Photoshop. However, it works exactly the same in Lightroom and most other editing programs.

I selected the graduated filter. You can see the darkened “graduated filter icon” at the very top of the screen capture.
In this case, my horizon line (from foreground to background) is at an angle. So, I started in the upper left corner and dragged down to the lower right corner.

Before dragging the graduated filter across the picture, I checked “overlay” and “mask” in the lower right corner of the workspace. This allowed me to see the placement of the mask.

When you look at the image, the “red area” indicates where the mask has been placed. The tricky part with masking is knowing what part of the image will be affected. In this case, the red (masked) area will be affected by the changes made in the toolbox. In other uses of masks, the red area may be the area that is unaffected.

You have to learn how each masking activity works.

After I was happy with the mask placement, I unchecked the “overlay” and “mask” boxes so that I could see how my edits were affecting the picture.
As you can see, the use of a mask created quite a dramatic difference on the background.
 

This example is a very simplistic use of masking. With masks, your creativity can become unlimited.

If you’d like to learn exactly how to improve your photography through the use of masks, you may want to look into the in-depth Understanding Masking please join our Photoshop workshop