The Golden Ratio Applied to Photographic Composition

If you have been using The Rule of Thirds in your photographic compositions, you may have discovered an inherent shortcoming. Composing for the Rule of Thirds involves lining up a subject with one of the recommended intersections or lines. This can sometimes result in the subject being crowded too close to the edge of the frame.

The problem can be minimized, if not eliminated using the Golden Ratio Grid, rather than the standard equally spaced Rule of Thirds grid.

What is the Golden Ratio?

It is worth while taking a look at what the Golden Ratio is before applying it. The concept was discussed as far back as 300BC as being mathematically interesting, and in addition to being called the Golden Ratio it is also referred to as the Golden Mean or Divine Proportion.

In simple terms, it refers to two measurements where the ratio of the sum of both measurements and the largest measurement is the same as the ratio of the largest and the smallest. In other words a + b / a is the same as a / b. This ratio is 1 to 1.618 and is often quoted to be found in nature, architecture, art and music amongst other things.

The mathematics of the Golden Ratio was further explored by a man called Fibonacci to deliver the Fibonacci Sequence of numbers. Start with 0 and 1 then progressively add the previous two numbers together to obtain the next. The sequence would progress as 0, 1, 1, 2, 3, 5, 8, 13, 21, 34, 55, and so on. The interesting thing is that the further the progression advances, the closer to the golden ratio becomes the result of dividing the next to the last number in sequence by the last number in sequence. For example, 55/34 is 1.617647…, and the result of 233/144 is 1.618055…

This sequence is used to generate another composition variation called the Golden Spiral. There are opinions that this spiral can be seen in a Nautilus shell, the seeds on a pine cone, and even the arms of the milky way. Such is the interest in the Golden Ratio that many regard it as the universal constant that all things in life relate to in one way or another.

How Do You Apply the Golden Ratio to Your Photos?

One simple way to apply the Golden Ratio is to apply it to a rule of thirds grid. But, instead of the three columns and rows being of equal width and height, the center column and row is 0.618 the measurement of the other two. If you place a subject at a row/column intersection now, you effectively move the subject further from the edge of the image frame, giving the subject more space.

You can also employ the Golden Spiral to place the main point of interest within the inside of the spiral. The spiral is created from the Fibonacci sequence, which when plotted as a series of Golden Rectangles with a series of arcs drawn within the rectangles, results in the spiral overlay. You can see this graphically represented on my website.  Adobe Lightroom provides composition overlays for the Golden Ratio grid and for the Golden Spiral.

Travel Photography: How to Capture the Character of a Place

Many different elements go into making up the character of a particular destination or location, whether it be a far flung exotic city or your home town. It is the travel photographer’s job to cover these elements in order to present that character to the viewer. This article looks into what goes into bringing the character of a place to the audience.

Essential Elements

There are many separate “parts” that make a location what it is, but these generally boil down to landscape, people, and culture. Let’s look at these in a little more depth.

Landscape

Every city, mountain range, or coastal area has its own unique look and feel. This might be created by architecture exclusive to that part of the world, such as Gaudi’s designs that are so prominent in Barcelona. Or well known landmarks (Eiffel Tower anyone?) or rough seas and steep cliffs like those so characteristic of the northern coasts of Scotland and Ireland. What does it look like in the morning? At night? The location might take on several personalities through the day, so it is essential to capture as many of these as you can to give a broader picture.

People

Possibly the most influential factor in the character of a location is the people who live there. The way they look and dress, the way they carry themselves, the lifestyle they live, and the customs they observe. Is there a particular piece of clothing that defines them? Or maybe a certain characteristic? For example, if they are known to be happy and smiling people, show them as such. If they are known to be hardworking, try to include some shots of workers.

Culture

This can encompass subjects such as food and drink. Local dishes give an immediate insight into the way of life lived by people of a particular place. Freshly caught seafood may be a specialty of the area, or it may be famous for a particular dessert or drink. Culture can also be shown in the festivals and events held in the particular region. This might be an annual parade where locals dress in the traditional costumes of their ancestors or a huge street party that captures the energy and vibrancy of a population.

Putting It All Together

To put these elements in photographic terms, I like to think of the process as zooming in on a subject. Starting with the landscape element described above, you essentially form an overview—or wide angle view—of the subject, capturing surroundings. Distinctive buildings and landmarks give a feel and sometimes instant recognition to the location.

Zoom in to form a collective portrait of the people, their way of life, and daily activities. It is a good idea to use both posed portraits and candid shots to show personalities as well as customs and way of life.

Finally zoom in further to capture details such as local food and dishes and detailed studies of buildings. Text such as in shop signs shows languages spoken. Also, look for any products that are traditional or well known in the area. For example, leather goods from Morocco or electronics from Japan.

Travel photography is, in a sense, a very broad specialization. Possibly not a specialization at all. A travel photographer needs to be a landscape photographer, portrait photographer, still life photographer, and nature photographer—often all in the space of a single shooting session. Learn to cover all these elements within the broader subject, and you are well on your way to becoming a more accomplished photographer.

Using Color to Create Strong Photo Compositions

Color is one of the most obvious elements of composition. Everyone knows that intense colors make people take notice of your images. Ever wonder why there are so many sunset and flower shots? Color is the reason.

Color has a couple of functions in photographs. First, color grabs the attention of the viewer. Perhaps, because this function of color is so palpable, many photographers miss the more sophisticated, and in some cases far more powerful, function of color: color sets the mood of an image. Since color is such an important compositional ingredient, the experienced photographer will want to use color to its fullest extend — incorporating both functions of color into images.

Grabbing the Viewer’s Attention

Utilizing color to grab attention is often rather straight forward. Generally, what is required is a saturated or intense color. This type of color tends to grab the viewer’s attention and focus it on the area of color. Furthermore, the color tends to keep the viewer’s attention for an extended period of time. When the viewer’s eyes do wander, the color tends to bring the attention back.

There are a couple of primary ways to use color to grab a viewer’s attention. The first way is to use very saturated, bold colors. An example of this approach would be a dramatic sunset. The second way of using color to grab a viewer’s attention is to use a mix of contrasting colors. An example of this approach would be an image of fall colors where there is a combination of red, orange, and yellow leaves.

Mood

Setting the mood through the use of color tends to be a more subtle application of color than when color is used to grab the attention. However, that does not mean that it is any less powerful.

Different colors elicit different moods. Since there are a huge number of colors, it is not possible to cover all of the colors and their impacts on viewers’ moods in an article such as this one. Instead, a few colors will be reviewed in an effort to convey how colors affect viewers’ feelings.

Blue

Blue tends to bring forth feelings of calm or cold depending on how the color is used. This is a reflection of how we perceive the color in nature: the deep calm ocean is blue, peaceful cloudless skies are blue, and large amounts of ice have a blue tint. Therefore, a photographer that wishes to create a feeling of calm in an image should include blue objects in the image such as a peaceful blue stream or a blue lake.

Green

Green often communicates a feeling of lushness and freshness. Again, our feelings about this color are tied up with how we frequently experience that color in nature. We tend to associate green with spring and new growth. Green is frequently used in landscape photography. Green meadows, plants, and fields can be used to convey the mood of a flourishing scene.

Yellow, Orange, and Red

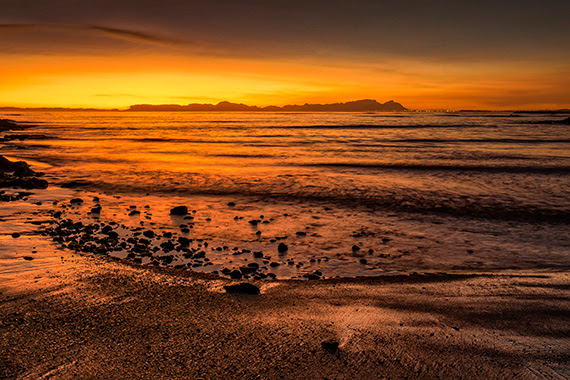
The last colors to be evaluated are the warm tones: yellow, orange, and red. These colors are associated with feelings of warmth and comfort (again the colors are tied to how we experience them in nature). Sunsets are a perfect example of how these warm colors create a comfortable feeling. Photographers that wish to take advantage of these colors can include, in their photographs, objects such as flowers, plants, food, and rocks that contain these colors.

Light

So far, we have looked at using color to create mood in photographs by means of including objects, with the appropriate colors, in an image. However, there is another way to use color to create mood in an image – the use of light. Early morning and evening provide a photographer with colored light which can be used to powerful effect in images. Before sunrise and about twenty minutes after sunset, everything is bathed in a soft blue light. This light can be used to create a calm mood such as an early morning shot of a beach bathed in the cool, blue light.

Just after sunrise and before sunset, the light is often very warm with red, orange, or yellow hues. This light can be used to create feelings of comfort such as a beautiful mountain peak bathed in a soft, warm, golden light.

Summary

When properly utilized, color can be one of the most effective methods of conveying mood in an image.

Harnessing Soft Light: Where & When to Find Diffused Lighting

As a photographer, understanding light is as fundamental as understanding your camera. One of the most flattering and universally appealing types of lighting is diffused light. This kind of light is soft, gentle, and does not cast harsh shadows, making it ideal for a variety of photography genres. But where and when can you find the best diffused lighting? Let’s dive into some key tips to help you harness the power of diffused light for your photography.

1. Golden Hour – Dawn and Dusk

Golden hour is that magical time just after sunrise or just before sunset. The sun is low in the sky, and its light is filtered through a greater amount of the Earth’s atmosphere, which scatters the direct sunlight and reduces its intensity. This natural diffusion creates a warm, soft light that is not only less intense but also casts long, gentle shadows. It’s perfect for portrait photography, landscape shots, and even urban scenes where the golden tones can bring a new dimension to your compositions.

2. Overcast Days – Natural Soft Boxes

Cloudy days might seem dull to the untrained eye, but they are actually perfect for diffused lighting. The clouds act like a giant softbox in the sky, scattering and softening the sunlight. This eliminates harsh shadows and provides a clean, even light that is excellent for shooting portraits, macro photography, or any scene where you want subtle details and colors to emerge without the interference of strong shadows.

3. Shaded Areas – Soft Shadows

When the sun is too intense, look for shaded areas under trees, buildings, or other large objects. These spots can provide a sanctuary of diffused light. The key here is to find areas where the sunlight is not directly hitting the subject but is instead filtered through or bounced off other surfaces. This setup is particularly useful for achieving beautifully lit portraits without squinting subjects or harsh facial shadows.

4. Using Windows – Indoor Diffusion

Indoors, windows can serve as excellent sources of diffused light, especially when covered with sheer curtains. The fabric acts to scatter the light, mimicking the effect of a softbox used in studio photography. This method is ideal for product photography, food photography, and portraits. The directional light from a window can also create a dynamic range of light and shadow, adding depth to your indoor shots.

5. The Blue Hour – Twilight Ambience

Following the golden hour, the blue hour provides a brief period where the sky takes on a predominantly blue tone with a cool, soft light. This light is diffused through the absence of the direct sun and offers a unique quality that is excellent for cityscapes, landscapes, and even nighttime portraiture. The softness helps to smooth out imperfections and brings a tranquil and ethereal mood to photographs.

6. Tools to Enhance Diffusion

While natural light provides many opportunities for diffused lighting, sometimes manipulation is necessary to achieve the perfect shot. Tools like diffusers, reflectors, and softboxes can help recreate or enhance the qualities of diffused light. These are particularly useful in harsh lighting conditions or when shooting in direct sunlight.

Summary:

Finding the perfect light can sometimes be a challenge, but with an understanding of where and when to find diffused light, you can significantly improve the quality and aesthetic of your photographs. Whether utilizing the golden tones of the early morning, the soft evenness of an overcast day, or the subtle hues of twilight, mastering diffused lighting can transform your photography. Always be prepared to observe and adapt to your environment to make the most of the light available to you, and don’t hesitate to use tools to create or enhance light diffusion where necessary.

Dive in Low light & Time Lapse photography

Timelapse photography is an awe-inspiring technique that compresses hours of footage into just a few seconds, revealing the subtle beauty of slow-moving changes. Whether it’s clouds scudding across a blue sky, a bustling cityscape, or a blooming flower, timelapse allows photographers to capture the dynamics of scenes that would otherwise be too subtle for the naked eye. In this post, we’ll explore the essentials of timelapse photography, providing you with the knowledge to start capturing your own stunning timelapse videos.

What is Timelapse Photography?

Timelapse photography involves taking a series of photos at regular intervals and combining them into a seamless video. By speeding up time, timelapse photography can turn seemingly mundane scenes into captivating sequences.

Equipment You’ll Need

  1. Camera: Any camera that has a manual mode and can shoot in RAW will work well. DSLRs and mirrorless cameras are popular choices due to their high-quality sensors and versatility.
  2. Tripod: Stability is key in timelapse photography. A sturdy tripod will ensure your camera stays immobile during the shoot.
  3. Intervalometer: This device or camera feature allows you to program the shooting intervals. Some cameras have built-in intervalometers, but external ones offer more flexibility and reliability.
  4. Memory Card: Since timelapse photography involves taking a large number of photos, a high-capacity memory card is essential.
    Extra Batteries: Running out of battery during a shoot can ruin your timelapse, so having extra batteries on hand is crucial.

Setting Up Your Shoot

1. Choosing a Subject

Pick a dynamic subject that changes over time, like a sunset, a busy pedestrian area, or changing weather patterns.

2. Framing Your Shot

Compose your shot as you would any other photograph. Remember, though, you’re capturing movement over time, so anticipate how elements might move within the frame.

3. Setting Intervals

The interval between shots depends on the speed of the subject’s movement. Faster movements (like clouds on a windy day) might require shorter intervals (e.g., 2-5 seconds), whereas slower movements (like shadows moving across a building) can use longer intervals (e.g., 30 seconds to 1 minute).

4. Manual Settings

Set your camera to manual mode to keep exposure consistent throughout the shoot. Aperture, shutter speed, and ISO should be manually adjusted based on the lighting conditions and desired effect.

Shooting and Post-Processing

Shooting

Start your intervalometer and let your camera do the work. Monitoring the process is crucial, especially for long-duration shoots, to ensure everything operates smoothly.

Post-Processing

Once you have your series of images, you can use software like Adobe Lightroom and LRTimelapse to edit and stitch your photos into a timelapse video. Post-processing allows you to adjust exposure, color balance, and other elements to ensure a consistent look across all frames.

Tips for Success

  • Weather Check: Always check the weather forecast before heading out. Unexpected weather can not only ruin your shoot but also damage your equipment.
  • Golden Hours: Shooting during sunrise or sunset provides beautiful lighting conditions and adds dramatic effects to your timelapse.
  • Experiment: Don’t be afraid to experiment with different intervals, settings, and subjects. Each location and subject will require a unique approach.

Timelapse photography is not just about capturing stunning videos; it’s about viewing the world in a new way. With patience and practice, you can unveil the hidden patterns of nature and human life, providing a mesmerizing perspective on the world around us. Happy shooting!