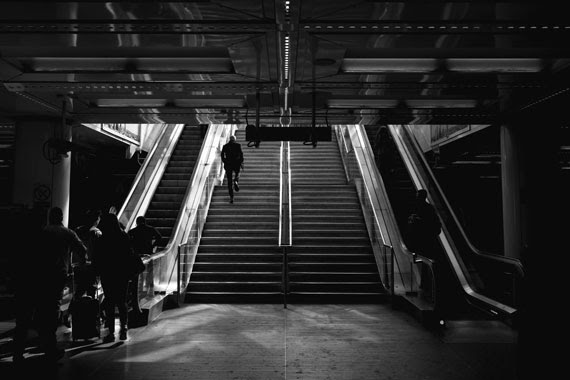
Best Spots for Street Photography in a City

Street photography is an art form that thrives on spontaneity, capturing candid moments of urban life that tell a story or evoke a particular feeling. While every city is unique, offering its own rhythm and character, there are common types of locations within any urban environment where street photographers can find compelling subjects and scenes. Here are some of the best spots in a city for street photography, each offering a window into the heartbeat of urban life.

1. Busy Marketplaces – silent corners

Marketplaces are bustling hubs of activity, color, and culture, making them perfect for street photography. They offer a variety of subjects in a single frame, from vendors and shoppers to a myriad of goods and the vibrant chaos of commerce. The interactions, expressions, and energy in marketplaces provide endless opportunities for dynamic shots.

2. Historic Neighborhoods

Every city has its historic quarters, streets that tell the story of its past. These neighborhoods often feature unique architectural details, old signs, and a sense of timelessness. Capturing life as it unfolds in these areas can create a fascinating contrast between the old and the new, offering a rich context for storytelling through photography.

3. Public Squares and Parks

Public squares and parks are gathering places for people from all walks of life. They serve as stages for a range of human activities — kids playing, couples relaxing, individuals lost in thought, or public performances. The variety of backdrops, from manicured gardens to grand architectural features, can enhance the visual appeal of your photographs.

4. Transit Hubs

Stations, bus terminals, and airports are transit hubs where people are often seen in transition, offering a glimpse into the journey aspect of urban life. These locations provide dynamic environments for capturing people in motion, varied interactions, and a mix of emotions, from the joy of greetings to the sadness of farewells.

5. Street Corners and Crosswalks

The intersections of busy streets are prime spots for capturing the flow of city life. Pedestrians, cyclists, cars, and street vendors converge at these points, creating opportunities for photographers to capture movement, interactions, and the organized chaos of urban living.

6. Cafés and Restaurants

Outdoor seating areas of cafés and restaurants offer a more relaxed atmosphere for street photography. They allow you to capture people in a range of activities — dining, conversing, or simply enjoying the street scene. These spots provide a more intimate glimpse into the everyday life and culture of the city.

7. Cultural Institutions and Events

Museums, galleries, theaters, and venues for cultural events are not only architectural landmarks but also gathering spots for diverse crowds. During events, these places offer a mix of excitement, interaction, and the convergence of different cultures, ideal for vibrant and expressive photography.

Respecting Privacy and Ensuring Safety

While street photography is about capturing authentic urban life, it’s paramount to do so with respect for individuals’ privacy and dignity. Always be mindful of people’s comfort levels and avoid taking intrusive photos that could invade their personal space or cause distress. It’s about observing and documenting life, not violating privacy or exploiting moments. Additionally, prioritize your safety and be aware of your surroundings, especially in crowded or less familiar areas. Respect local laws and customs, and if someone indicates they do not wish to be photographed, honor their request without hesitation. By fostering an approach rooted in respect and ethical considerations, you can create compelling imagery that truly honors the essence of street life.

Conclusion

The best spots for street photography in a city are those where life unfolds in its most authentic and vibrant forms. While the locations mentioned above are typical hotspots, the true essence of street photography lies in the unexpected moments that you stumble upon. Always be ready with your camera, for the streets are alive with stories waiting to be captured. Whether you’re a seasoned photographer or new to the field, exploring these urban canvases can be a deeply rewarding experience, full of surprises and profound insights into the human experience.


Subframing in Photography Composition

Subframing is a compelling composition technique that allows you to create more intriguing and layered images. By using elements within the scene to create a frame within the frame, photographers can guide the viewer’s attention, add depth, and enhance the storytelling aspect of their images. This blog post will delve into the concept of subframing, discuss its benefits, and provide tips on how to effectively use this technique to elevate your photography.

Understanding Subframing

Subframing involves using components of your scene to create a secondary frame within your image. This could be anything from architectural elements, like windows or doorways, to natural features like tree branches or rocks. By positioning these elements around the edge of your composition, you can isolate your subject in a way that draws the viewer’s eye directly to it.

Benefits of Subframing

  • Focus on the Subject: Subframing naturally draws the viewer’s attention towards the main subject, helping it stand out amidst potentially busy or distracting backgrounds.
  • Added Depth: Using elements in the foreground and background to create a frame adds layers to your photograph, enhancing its three-dimensional feel.
  • Narrative Quality: A frame within a frame can introduce context or suggest a story, adding a narrative element to your image.
  • Aesthetic Appeal: Subframing can add a creative and artistic touch, making images more visually appealing and engaging.

Tips for Effective Subframing

  • Look for Natural Frames: Pay attention to your environment and identify potential frames such as windows, archways, or foliage.
  • Experiment with Depth of Field: Using a shallow depth of field can blur the framing elements, placing greater emphasis on your subject while still benefiting from the subframe.
  • Consider the Light: Lighting can impact how your subframe and subject interact. For instance, backlighting can silhouette your frame, highlighting the subject inside.
  • Play with Perspectives: Changing your angle or perspective can turn ordinary elements into effective frames. Sometimes, getting lower or finding a higher vantage point can reveal framing opportunities.
  • Keep It Simple: While subframing adds complexity to your composition, it’s crucial not to overcomplicate it. Ensure that the framing elements do not overshadow the main subject.
  • Use Editing to Enhance: Post-processing can help refine your subframed shots. Adjusting contrast, sharpness, or vignetting can further draw attention to your framed subject.

Framing vs Subframing:

While both framing and subframing are compositional techniques that involve the use of elements within the scene to enhance the photograph, they serve different purposes and are employed in distinct ways. Framing, in its traditional sense, refers to the use of foreground elements to create a border around the entire photograph, helping to isolate the main subject and draw the viewer’s eye towards it. This technique typically involves using the edges of the scene to enclose the subject, offering a sense of completeness and focus.

Subframing, on the other hand, is a more nuanced approach where the photographer uses elements within the scene—not just at the edges—to create a secondary, often smaller frame within the image. This internal frame leads the viewer’s eye to a particular area or subject, adding an additional layer of context or meaning. Subframing can be more subtle and complex, allowing for richer narratives and a deeper sense of space within the photograph.

In essence, while traditional framing defines the outer boundary of an image, subframing introduces an inner boundary or point of interest that guides the viewer deeper into the scene. This inner frame can intersect with the edges of the photograph or float entirely within the image, offering a unique and compelling way to highlight the focal point and add depth to the composition.

Summary:

Subframing is a powerful compositional tool that can add depth, focus, and narrative to your photographs. By mindfully observing your environment and experimenting with different techniques, you can master subframing and create more impactful and meaningful images. Remember, the best way to improve is to practice, so grab your camera and start exploring the world of subframing.

Whether you’re a seasoned professional or a budding photographer, incorporating subframing into your compositional toolkit can transform your visual storytelling and elevate your photographic work.

The Importance of a Focal Point

A focal point is the part of an image that draws the eye of a viewer to the most important part of the image or the area that you want to highlight. How you do this will make or break the final image. If you don’t know how to create this point then you will not achieve much in your photography.

The professionals have all worked this one out and if you are attempting to create similar images then learn this point well. It frustrates the eye of a viewer if there is no focal point, as the eye is not drawn to any one particular part of the photo. The focal point only occupies a small part of the scene but will make or break the whole image. The simplest form of this is an isolated object seen from a distance on a plain background.

So how is this achieved successfully? Let’s take a look at a few pointers.

1. Placing the Focal Point

Fundamental to photography this rule needs to be learnt well and executed to perfection. If you know where to place your focal point then you will shoot great images every time. A focal point needs to be off centred and never in the middle of an image. The rule of thirds places it at a point that is very pleasing to the eye as discovered by the ancient Greeks. This golden rule will bring you success every time. Imagine a noughts and crosses or tic-tac-toe grid. Two lines across the image and two lines down the image—vertically and horizontally placed. Equally spaced, they cut the image up into thirds. Where these lines intersect are your focal points. The horizontal lines are where you place your horizons. The human eye loves to view subjects placed at these intersections. Take a magazine or travel book and take a look at how many times this rule is used effectively and see how your eye is drawn to them.

2. Selective Focus

This is an incredibly effective way to focus attention on your subject of focal point. You need to know how aperture and depth of field works in order to use it properly. But, basically it’s very simple. Your settings (e.g. f/2.8, f/4, f/5.6 and so on) change the size of your aperture all the way up to f/32. You only need to be concerned with the lower apertures for this effect. If your lens goes to f/1.2, brilliant, but most lenses won’t take you below f/4 or f/2.8, as they get more expensive the wider the aperture. Depth of field is the area of focus in front of and behind your subject. With the aperture wide open at f/2.8 you will have very little in focus which makes it so effective with selective focusing. Everything not on the same focal plane as the subject will be out of focus and thereby excluded from the viewer’s attention. The longer your lens, the less depth of field you will have and the more you will be able to selectively focus.

It’s a great way of drawing attention when used in conjunction with the rule of thirds.

3. Exposure

By underexposing parts of the image (i.e. making them darker), the areas that are light will stand out. If you are able to able to use this effectively the light parts will stand out as focal points and whatever you place here will become the point of focus in the photo. This really works well if you have a subject that is lighter than the underexposed, darker areas. Key to the process is knowing what the final image will look like in mind’s eye.

4. Light Source

This really pushes your photographic eye to the limits and if you see the opportunity and go for it, will result in a stunning photo. How this works is that when you see a shaft of light or a ray of sunlight entering a window or coming through the clouds, use it to place your subject. A patch of late afternoon sun in dimming light will create an area that is much lighter than the surroundings.

When you shoot an image and take the metering off this area, the surrounding environment will appear darker. The image now has a focal point that draws the eye in to the image. This will also work at night where a solitary window is lit and the surrounding area is dark. Experiment with this technique and you will soon be creating dramatically lit photos.

5. Eyes

By placing a person’s eyes on a two thirds intersection a viewers eyes are immediately drawn to that area. When the subject is looking down on something else like a child or an object your eye will be naturally drawn to the point where the subjects eyes are focused. Whenever you shoot a person eyes they will automatically become the focal point so if they are the focal point then you have a problem and they will compete for attention.

6. Two Focal Points

Sometimes you will have two focal points and there will be competition, but, you can offset this by using size. One of the focal points must be considerably larger which will draw the eye but immediately your focus will move to the smaller focal point. If they are the same size the viewer’s eyes will dart between them. So be very careful when using a double focal point.

A focal point is essential to any great image and you need to be able to create this in every image. An image lacking this will appear flat and without impact. As you learn digital photography it will become easier and easier to place it in the right position. Happy shooting!

Action Photography: Quick Tips You Should Use

Getting great photographs of the world in motion is a difficult task. More than any other kind of photography, action photography demands lightning-quick reflexes, a solid foundation in composition and other photo elements, and a little bit of luck. That being said, anyone can learn to take great action shots if they’re willing to commit a little time to understanding the methods to the madness. Here are some techniques to get you started taking action photos:

Know Your Subject Matter

Due to the short amount of time you have to shoot, it’s important that you understand the subject you’re photographing. For example, with basketball, if you’re not near the basket, you won’t get a good picture of the next dunk. Before you start shooting a particular subject in action, take time to understand your subject so you can anticipate the action before it happens.

Get the Subject in Action

You want to always try to get the subject at the time when the action is at its maximum impact. For example if you’re photographing snowboarders jumping off a ramp, know what type of shot you want. Do you want the launch, the landing, or the highest part in the jump? Action photography can be captivating if you compose the picture to include the most interesting part of the action. So, always be thinking of the best way to compose your picture.

Focus in Advance

Many professional photographers focus their cameras on an empty space where they expect something to happen. This is an easy thing to do if you know the activity you’re shooting, and it will save you valuable time when someone is flying through the air in your frame and you have milliseconds to react.

Pan with the Subject

It is important in action photography that you convey motion in the final print. While some subjects will have obvious motion, such as a basketball player frozen mid-dunk, others may require a bit of work on your part. Panning is when you move your camera to keep up with the subject as they pass in front of you. This will give you the end result of the subject being clearly in focus but the background being blurred by the motion of the camera.

Using the Right ISO and Using a Flash

High ISO is usually best for action photography. The high light sensitivity will let you use faster shutter speeds in more varied light situations and help you to freeze actions perfectly. For ultra fast movements, a flash can also be helpful; however, most built-in camera flashes won’t work well beyond 10 feet.

Frame the Image for Action

Try not to simply stop the action of a subject in your photograph. While freezing an action in progress is a good goal for an action shot, allow the viewer room to follow the action to a possible conclusion. For example if you have someone jumping down some stairs, position the subject near the top of the picture and have some stairs below so it’s easier to understand the outcome of the action.

Digital Makes it Easier

Action photography takes an enormous amount of patience and practice. Thanks to digital cameras and their near-endless supply of photographs, you can practice your action shots without taking a huge hit on your wallet. And even better, many modern cameras have continuous shooting modes that allow you to shoot 10-50 images in rapid succession, so you can have more opportunities for the perfect shot.

Anytime your shooting action photography, safety needs to come first so you can avoid injuring yourself or the subject in motion. Never position yourself where you run the risk of getting hit by vehicles or athletes, and make sure that the people you are shooting are aware of where you’ll be during the activity. Beyond that, the more you shoot, the better you’ll get!

Street Photography Tips at Night- upgrade your photos.

Taking pictures at night gives an image a completely different feel because it captures different stories of daily life—sometimes more dramatic than the ones captured during the day. There is also a whole new cast of characters at night that make taking pictures on the streets after dark an even more adventurous experience in street photography.

Just by decreasing the available light, we increase the element of mystery in the image. Don’t get me wrong, it could still be an average image. Just because it was taken at night the picture won’t magically become a great photograph, but it might become a little bit more interesting. It may make the viewer ask just a few more questions. And depending on where you are, it may even add an element of danger.

“You don’t have to go looking for pictures. The material is generous. You go out and the pictures are staring at you.” –Lee Friedlander

Here are a few tips for taking street photos at night:

1. Don’t use flash

I think this is key for several reasons. First, the ugly artificial light that results from the flash is just too harsh and unnatural. It also calls way too much attention to the photographer, and the idea in street photography is to blend in, not stand out like a lighthouse. Also, people expect the flash to go off after you take a picture at night; when they don’t see the bright light coming from the camera that was pointed at them, they think that you didn’t take a photo and they probably won’t question you. I never use flash when I shoot at night (or day or ever, for that matter). It might take some practice but in a short time you won’t miss it.

2. Increase the ISO

More than a suggestion, this is a necessity. Unless you increase the ISO, the shutter speed might become too slow and the whole picture will be way too blurry to even see what’s going on. As I wrote before, a little bit of motion blur is fantastic and makes for great street photography shots. But if the photo’s too blurry it loses the effect and is just confusing.

High ISO will also give the image some “noise” and it will look grainy, which is a great look for street photography. Make grain and blur your friends, not your enemies.

“New images surround us everywhere. They are invisible only because of sterile routine convention and fear.” –Lisette Model

3. Use available light to your advantage

Find a bright corner or a storefront window and position yourself in a way that it will light your subject’s face. Or maybe you want the light to their backs to make them silhouettes. Either way is fine, the choice is yours. It’s all a matter of moving around the light. Find what works and wait for an interesting subject to walk by. Try pointing the camera into the inside of storefronts or brightly lit buses; the light may be just enough to capture great scenes of people unaware that you are capturing the scene.

4. Use fast lenses

Fast lenses, with maximum apertures such as f/2.8 or f/1.4 are great for low light situations. The same thing applies to full frame cameras. Any lens or camera is fine but full frame cameras or fast lenses make things easier because they have a better sensitivity to light. Use what you have and practice and look at the results before you invest your paycheck in a more expensive camera or lens.

“Anything that excites me for any reason, I will photograph; not searching for unusual subject matter, but making the commonplace unusual” –Edward Weston

5. Avoid isolated areas

It’s not necessary to go to a dangerous area to get interesting pictures. Any crowded area will do, especially if you are just starting.

Taking pictures on the streets at night is not the usual thing to do, but if you want to give your street photography a little extra excitement consider going out for a walk after the sunlight has been replaced by street lamps.